Tag Archives: crochet

Crochet Pyramid Bag


Crochet Pyramid Bag

Introducing… The Pyramid Bag.. a long time Ago, I was thinking of making 3 triangular pouches from a pattern on the internet.. This was made by joining 2 Triangle crochet pieces together.. though I made 6 pieces .. 2 in each colour combo.. I got interested in other projects and this became another basket WIP….

Yesterday I pulled them out and made one simple traingular pouch.. but wanted to do something different with the rest.. so Lo behold … The Pyramid bag.. got 4 triangular pieces( I made 2 more for this one in the same combination) used old plastic table mats inside the lining of the bag to give shape and definition.. fixed a zipper, a wooden beaded handle and a base with wooden beads. When I posted ths in my group…..the response was tremendous….Some of the lovely gals there wanted me to create a CAL and share how I lined the bag to give it shape…

Though I am not going to make this purse again…I thought..I will write and by a small pic tutorial show how I did the lining..  .

Size Of the bag: 

Is 16 cms in height and as this is an equilateral Triangle the width is 16cms.

Material Used:

Yarn:

Nature’s Cotton Yarn from Soft Feather

Hook Size:

3:00mm

Lining:

A plastic table mat , or thick canvas, or any material that is flexible, you can cut into shape..may be used beneath the lining.

Lining material approx half a metre…

Method:

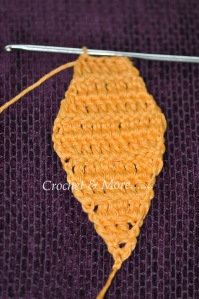
Make 4 equilateral triangles ..that is 4 triangles where the 3 sides are of the same length. All the 4 triangle should be of the same size and shape( I say shape becos sometimes in corchet we have triangle patterns where the 3 points may be rounded). Whichever pattern you use…for the triangles….make sure the size used is the same for all 4.

Pattern:

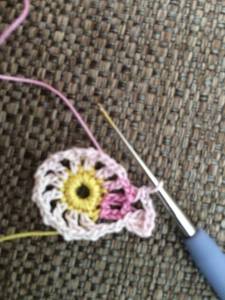
I have written out the first 2 rounds for those who may find it difficult….

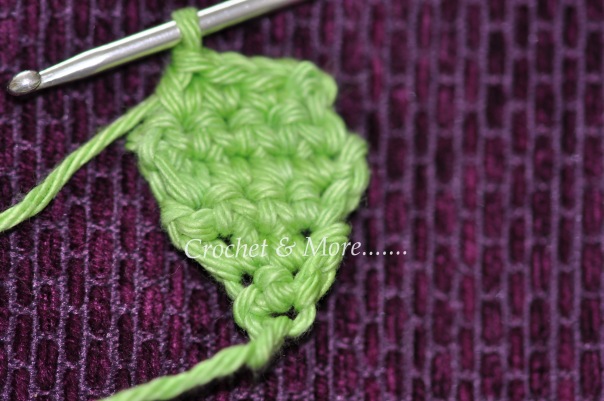
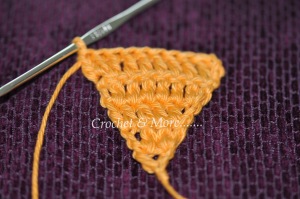
Pattern for a triangle
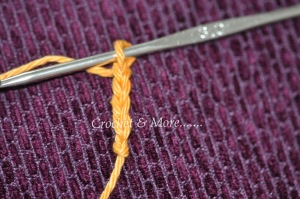
Make a magic circle

Round 1: Into the magic circle .. hook in 3 ch, 2dc; 2ch; 6dc; 2ch; 6dc; 2ch; 3dc; ss

Round 2:
3ch up, 4dc; 2ch; 10dc; 2ch; 10ch; 2ch; 5dc; ss

For those who find it difficult to read a crochet graph pls do check this link….

https://crochetnmore.wordpress.com/2014/08/11/how-to-read-a-crochet-pattern-1/


 Lining:

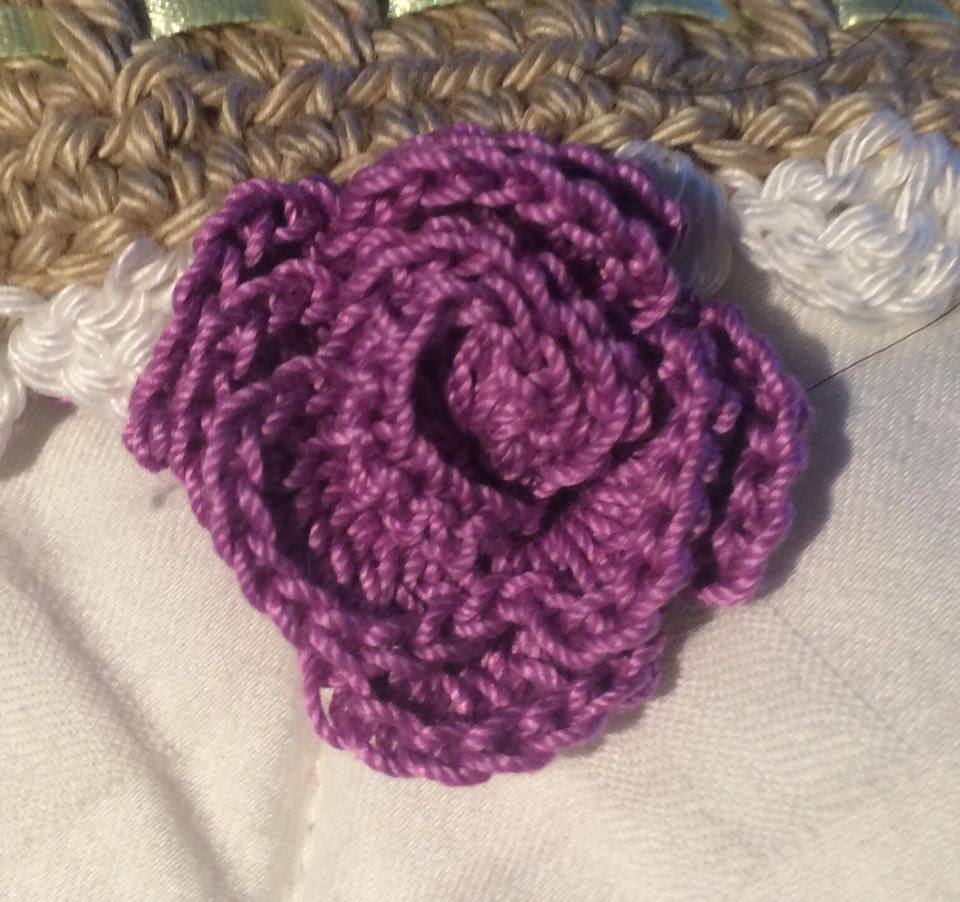
After you hook in the 4 crochet triangles….you can accessorise it with beads/ribbons/tassels, sequences  etc…or you can wait until all the pieces have been joined.

Cut out 4 triangles out of the plastic mat at a slightly smaller size than the triangles.

(The pic below is just an example and not in original size)

Then placing the lining material in front of you fold it into half(making sure the ‘right’ sides are facing each other)…place the plastic triangle on top of the material and then using a cloth marker pen or a pencil or fabric chalk….mark out  an outline around the triangle.This first outline is the size we require…this is the outline we will stitch on. So let us call it outline A

Then measure half an inch from that outline and mark out an outline around the triangle half an inch away from the original outline. This second and most external outline is the one we will cut …so that now you have an excess of half an inch around the original triangle. We will call this B

Now cut along B and seperate this piece from the main material…you will now have 2 triangular fabric pieces of the same size.

(The pic below is just an example and not in original size)

Now stitch along 2 sides of outline A….keeping 2 triangle pieces together.

Then pull the triangle inside out…This is make the stitched part go inside and then place the plastic triangle inside and inbetween the triangular envelope that you have just created.

Then sew in the 3rd side and close it up.

Repeat with the other 3 triangles.

Now place each of fabric lined triangles on each of the crochet triangles and stitch it on to them. Thus you now have 4 lined crochet triangles.

Alternately you can also join all the 4 lined triangles to create a bag…Join all the crochet triangles seperately to create another bag. Then place the lined triangle bag inside the crochet triangle bag and sew the lined bag onto the crochet bag.

Joining the Triangles to form a Pyramid

 Join all the four lined triangles by placing one triangle in the centre, and the other 3 facing each of the centre triangle’s sides. So that each side of the centre triangle should be aligned with that of each of the other triangles.

(The pic below is just an example and not in original size) 

Join the sides of the triangle using single crochet(sc) but make sure that you leave one side  unjoined. On this side you have 2 lips…….do half double crochet(hdc) along both the lips. This is your bag’s opening…..where you fix your zip.

 Join the sides of the triangle using single crochet(sc) but make sure that you leave one side  unjoined. On this side you have 2 lips…….do half double crochet(hdc) along both the lips. This is your bag’s opening…..where you fix your zip.

Sew the zip by first fixing both ends by pins to the lip opening corners of the purse. Once it is fixed….sew in the zip to the lip around the opening. Cut away the excess length of the zip.

You can see the zip below….

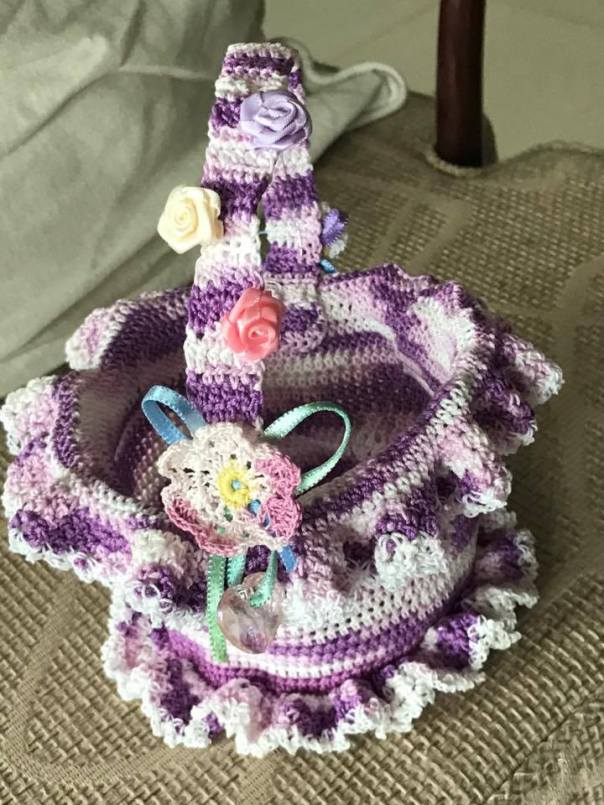
Below is how the bag looks from the top…an aerial view…. You can make any type of handle or get a ready made one….I made a handle out of wodden beads…..and then used smaller wooden beads around the base of the bag.


And there you go…..One lovely Pyramid Bag….You can really play with this…use a thinner thread and create a lacey effect…..ofcourse you will make to hook in a few more rounds…..crochet it in with beads, and tassels, use an i-cord or a beaded i-cord….Use can place the opening in a different manner….Perhaps you can open up an entire side and fix a long zip around the opening….There is just so much you can do with this pattern….Go where your creativity takes you and have a lot of fun with…Hugs!

Hans/Hamsam/Swan Motif

Hans/Hamsam/Swan Motif

So this week’s  wonderful challenge by Tulasi K Reddy  is a swan motif and what bird could be dearer to us after the peacock? It is a great pattern made out of a pinepple motif and I salute the brain that conjured this one up.

Swans have been eulogised in Indian Literature and Hinduism, for many thousands of years….Beautiful, graceful and almost celestial….they have inspired poets and artists all over the world.

In India, the Hamsa, or Hansa,  Arayanna, or heavenly hamsa (swans), are said to live in Manasasaras in the  Himalayas. They are mentioned in , the Ramayana. Hamsa, the swan, is part of the love story of Nala and Damayanthi in the Mahabharatha…where it carries the stories, historical information and messages between the two lovers.

In the West….the most famous contemporary story about the Swan is the fairy tale “The Ugly Duckling”. And what an adorable little tale it is……

The hamsa, or the swan, is often identified with the Supreme Spirit, Ultimate Reality or  Brahman in  Hinduism. The flight of the hamsa symbolizes moksha, the release from the cycle of samsara or life cycles on this earth.

The hamsa is also the vahana of  Saraswathi– the Goddess of knowledge and creative arts, and her husband, God Brahma.

And now on to making some crochet music with the Hamsa

Materials

Anchor #20 – white

Hook

#1:00mm

Abbreviations

ss – slip stitch

ch – chain

sc – single crochet

hdc – half double crochet

dc – double crochet

treble crochet – tc

ss – slip stitich

Pattern

Method

Make a slip stitich


Row 1:

3 ch up, 1 dc; 2chs; 2dcs; 2chs; 2dc into the magic ring

Pull in the short tail of the magic ring tightening the stitches into a continous row.

Row 2:

3 ch up, 1 dc in next dc; (2dcs 2ch 2dc) in 2ch loop, 3 ch; skip 2 dcs; 2 dcs in 2 ch loop; 2 chs; 3dc in same 2 ch loop do not complete the last dc …holding the last 2 loops on the hook…crochet in a dc in the last dc then pull then yarn over and pull it thru all the 3 loops on the hook. Thus creating an inverted ‘V’ Stitch which we sha call (‘IV’) form now on.

Row 3:

3ch up; skip 2 dc; 2 dc, 2ch, 2dc into the first 2 ch loop; 2 ch, dc, 3ch, dc into the 3 ch loop;  2ch; 2 dc, 2ch, 2dc into the first 2 ch loop; dc into dc; skip one dc; dc into next dc,keep two loops on the hook, dc in next dc and pull the yarn thru all the 3 loops on the hook.(IV)

Row 4:

3 ch up, dc  each in next 2 dcs; ch; 2 dc, 2ch, 2dc into the first 2 ch loop; 2 ch; Hook  (dc, ch,dc) 3 times  into the 3 chain loop( this is the base of your pineapple stitch); 2 ch; 2 dc, 2ch, 2dc into the next 2 ch loop; dc into last dc

Row 5:

5 ch up;  2 dc, 2ch, 2dc into the first 2 ch loop; 2ch; sc in first dc in 3 ch loop, 3 ch, sc into next dc, 3 ch, repeat until you cover all the dcs and get 4 (3ch) loops( This is the 2nd tier of your pineapple stitch.); 2ch; 2 dc, 2ch, 2dc into the next 2 ch loop.

You leave the rest of the stitches on the previous stitches vacant for now…This is where you will work the neck.

Row 6

5 ch up;  2 dc, 2ch, 2dc into the first 2 ch loop; 2ch; sc in first dc in 3 ch loop, 3 ch, sc into next dc, 3 ch, repeat until you cover all the dcs and get 3 (3ch) loops( This is the 3rd tier of your pineapple stitch.); 2ch; 2 dc, 2ch, 2dc into the next 2 ch loop.

Row 7:

5 ch up;  2 dc, 2ch, 2dc into the first 2 ch loop; 2ch; sc in first dc in 3 ch loop, 3 ch, sc into next dc, 3 ch, repeat until you cover all the dcs and get 2 (3ch) loops( This is the 4th tier of your pineapple stitch.); 2ch; 2 dc, 2ch, 2dc into the next 2 ch loop

Row 8:

5 ch up;  2 dc, 2ch, 2dc into the first 2 ch loop; 2ch; sc in first dc in 3 ch loop, 3 ch, sc into next dc, and get one (3ch) loop( This is the 5th tier of your pineapple stitch.); 2ch; 2 dc, 2ch, 2dc into the next 2 ch loop

Row 9:

5 ch up;  2 dc, 2ch, 2dc into the first 2 ch loop; 4ch; sc in 3 ch loop, 3 ch, ss into sc, 3ch, ss into sc; 4ch; 2 dc, 2ch, 2dc into the next 2 ch loop.

Row 10:

5 ch up;  2 dc, 2ch, 2dc into the first 2 ch loop; 5ch;  2 dc, 2ch, 2dc into the first 2 ch loop

Row 11:

3 ch up; double treble(keeping the last 2 loops on the hook) another double treble and keep all 3 loops on the hook and yarn over and pull through all 3 loops. A petal is formed

3 ch, 1 picot, 3ch; hook in a second petal as above.

Repeat until there are 3 picot loops and 4 petals.( this is the tail of the swan)

Cut the thread and tuck the loose ends in… You are done with the body of the swan.

Now for the Neck and Head…

Row 1:

Join the thread to fifth stitch(double crochet) from your left, of the fourth(4th) row.

3 ch up; dc in one ch loop; dc in next dc, leave the last two loops on the hook, dc in next dc…now pull thru all 3 loops. (IV)

Row 2:

2 ch up;  dc in next dc ;2 dcs in next dc

Row 3:

3ch up, dc in same dc; dc in next dc; (IV)

Row 4:

2 ch up; dc in next dc; 2 dcs in next dc

Row 5:

5 ch up; double treble in same stitch; hdc in next dc; sc in next stitch

Row 6:

one chain up; sc in next stitch; dc in next stitch, double treble in same stitch

Row 7:

5 ch up, double treble in same stitch; dc in next stitch; hdc  in next stitch

Row 8:

2 ch up; hdc in next dc; dc in next stitch; 2 dc in the last stitch

Row 9:

3 ch up; dc in next dc; dc in next dc, (IV)

Beak

( I made a little change to the pattern here….I wanted the beak to be a little authentic…so I used a #40 Anchor cotton in black and did 3 scs in a row after row 9

Then cut the thread tucked it in and added a #8 Pearl red DMC(also available in Anchor)

( If you don’t have #40 just use one thread of a 6 skein Hank of embroidery floss for the black portion and 2 threads of embroidery thread in red for the beak)

Now Using the red

If you don’t wish to change the thread continue with the same thread and finish off.

Row 10:

2 ch up; dc in same stitch

There you go…..a perfect Swan.

Star Burst Bauble/Hot Pad/Pendant

Star Burst

This is an extremely easy, fun project. We had this as part of a Weekly  challenge by my young,dynamic and talented pal, Tulasi K Reddy,  in our group and I just leapt at the chance…..mainly becos this was part of my to do list for the longest of time. It looks complicated to a novice but is really so easy and is an apt project for a beginner.

Material

You can use any thread you wish just adjust the hook size accordingly.

I used:

Soft Feather Nature’s cotton in Turquoise green and cobalt blue

Hook Size: 3:00mm. This is my favourtie size for Nature’s cotton yarn.

Abbreviations Used:

sc – single crochet

dc – double crochet

ss – slip stitch

Pattern

Make a Magic Circle

Round 1: Chain 3 up, 3dc, 4 chain; 4dc, 4 chain; 4dc, 4 chain; 4dc, 4 chain; ss.


Round 2: ss into the next dc; chain up and sc in same dc.

Now into the 3 chain loop –  sc,hdc,8 dc,hdc

sc in the second dc of previous round then repeat sc, hdc,8dc,hdc  in next loop….

Repeat until all 4 loops are covered.

Make 5 such squares


Joining the squares and forming another row around the squares:

Join the cobalt blue by an ss to the sc in between the 2 petals. then scs in every hdc and dc.

Continue until  you cover 2 petals or are mid way.


Now join the 2nd motif to the first using a sc.


Continue joining all the motifs one by one unitl you have a straight line.

Then continue the sc row on the lower part of every motif.

The pics I took of the joining part didn’t come out right….balancing the camera with one hand and trying to hold the petals open with another just didn’t work…..so am using this pic that I found in the net…..to show you how to join the motifs.

You need to take one half one petal of 2 motifs that lie adjecent to each other and join them with an sc…then move on to the next two petals. You will then get 5 petals.


Depending on the size you wish you can use yarn or thread.

Cotton Yarn gives a a size that cna be used as a coaster….Alternatively you can make this is 3  colours too….Using birght colours to use in a child’s room or jsut above the crib for your baby.

A talented crochet buddy, Dipti Mallapur, made this as a pendant in #40 thread and it looked glorious!

This is a great little piece to hook in when you just want to have fun and take it easy….I hope you do…

Have Fun!


Vintage Table Runner

Vintage Table Runner

Crochet Chronicles: 

My elderly Parents live with my sister or she lives with them….depending on how you wish to see it…:-) . Both of them are in their 80s and are active both mentally and physically. Though my Father suffers from Parkinsons ( He still hasn’t reached that stage where he needs help)…he is always positive and a wall of strength to all of us. My Mother holds our home together….and is such a superlative cook…that we look so forward to meal times. Now she has taught the lady who helps out at home, Vrindha all her culinary tricks so that even when she does become incapacitated…her darling grandsons will still get those scrumptious delights. Parents….What are we without them? Who will love us, care for us, worry about us and be there for us like them? As my Parents grow older and more feeble…..I feel this sense of fear and despair at facing a future without them.

But enough of such dark and despairing thoughts…The reason I wrote about my Parents is because, this particular runner was made at my Mother’s insistence. My sister bought a new dining table and a chest of drawers to go with it…and all my Mom’s old and beautiful collection of laces wouldn’t do for this. So My scrupulous Mom…who has exceedingly very high standards on what goes on her furniture rang me up and told me that she wanted me to make her a table runner.

I was so thrilled! I never thought that my work would ever be good enough for her….I know she loves pastels and white….so I made this one in shades of ice pink, peach, lolly pop pink and white, mint green, light yellow and white. Though the original pattern is all in white…I thought this made an interesting  picture. What do you think?


Materials Used:

Anchor cotton #20 in pastel shades and white. I used 5 balls of white and 10 gms and a little less of each of the other colors.

Hook 0.75mm I normally use 0.9mm to 1.25mm with #20 thread…but decided to experiment with a much smaller hook. I like the lacy effect, though hooking is hard on the hand.

Pattern:

Since this is a vintage pattern, there is no graph as such…but there is a written pattern at this link, below:

http://freevintagecrochet.com/doilies/7717-doily-pattern.html

And as Always…here is the photo tutorial….

Runner measures about 14 x 38½ inches.

Each motif measures about 3½ inches in diameter.

FIRST MOTIF

Starting at center, ch 6. Join with sl st to form ring.

13081727_552952411558805_970560264_n


1st rnd: Ch 1, work 12 sc in ring. Join with sl st in 1st sc.


13101154_552957344891645_931585906_n


2nd rnd: Ch 5 (to count as 1 dc and ch 2), * dc in next sc, ch 2. Repeat from * around, joining last ch-2 with sl st in 3rd st of starting ch-5 (12 sps).


13077380_552957348224978_1531402859_n 13084273_552957334891646_2051752738_n

3rd rnd: Ch 3, 2 dc in same place as sl st, * ch 3, sc in next dc, ch 3, 3 dc in next dc. Repeat from * around. Join.

13081859_552957354891644_962207236_n


4th rnd: Ch 3, dc in same place as sl st, * dc in next dc, 2 dc in next dc, ch 4, sc in next sc, ch 4, 2 dc in next dc. Repeat from * around. Join.


13115770_552958191558227_1403379450_n

13081846_552958208224892_513314797_n 13115327_552958198224893_154325539_n

5th rnd: Ch 3, dc in same place as 3 ch, *dc in next dc, 2dc in next dc,  ch 3, skip 3 ch, sc in next sc, ch 3, 2 dc  in next dc. Repeat from * around, ending with ch 3, tr in 1st sc.

13101489_552958391558207_1700455324_n

13101484_552958384891541_773313651_n

13077136_552958401558206_122171011_n


Here I have changed the pattern from the original a little…

6th rnd: sc in same stitch as ss, Ch 7,  sc in top of tr just made, * ch 10, 1 sc in center st of next ch-7. Repeat from * around. Join.

13100990_552958534891526_1052217529_n

13084238_552958528224860_1113785931_n

13115510_552958604891519_1802798652_n

7th rnd: Sl st in next 2 dc, * in next loop make (4 sc, ch 4) 3 times and 4 sc. Repeat from * around. Join and break off.


13115510_552958604891519_1802798652_n-2


SECOND MOTIF … Work same as for First Motif until 6th rnd is com­pleted.


7th rnd: Sl st in next 2 dc, * in next loop make 4 sc, ch 4 and 4 sc; ch 2, sl st in corresponding ch-4 loop on First Motif, ch 2, in same loop on Second Motif make 4 sc, ch 4 and 4 sc. Repeat from * once more. Complete rnd with no more joinings.


13115510_552958604891519_1802798652_n

Make 4 x 11 motifs, joining them as First Motif was joined to Second Mo­tif and leaving one large loop free be­tween joinings.


13084234_552958541558192_274889797_n


13081833_552958748224838_1327630115_n-2


Unfortunately..I was travelling while the next part was being hooked and the pics just didn’t come out right…..However the written pattern below will def help..

FILL-IN-MOTIF … Attach thread in center ch-4 loop of any large loop between joinings.

1st rnd: Ch 3, 2 dc where thread was attached, * ch 5, 3 dc in center ch-4 loop of next large loop. Repeat from * 2 more times; ch 5, sl st in 3rd st of starting ch-3.

2nd rnd: In next ch-5 loop make 4 sc, ch 5 and 4 sc, * 4 sc in next loop, ch 2, sl st in last ch-5 loop, ch 2, 4 sc in same loop as last 4 sc. Repeat from * around. Join and break off. Press through damp cloth. Starch lightly and press.

 13090047_552958864891493_1337790906_n

Vintage Flower Basket

Flower Basket


This Flower Basket is of a vintage patern with girly frills skirting both the top and the bottom of the basket.

I am pasting the original pattern here but will give you a photographic explaination on how to work ths very pretty and extremely easy pattern…It’s so easy that I finished this in just 4-5 hours.

It’s a great adn unusal pattern to use to give gifts of chocolate, flowers, scented soap bars, little aromatherapy oils and scents etc…….

Materials Needed are:

#10 Aunt Lydia’s thread….it comes in 100 gm balls…but you will need jsut 1/3rd of it.

Hook 1.75mm is what I used ..you can go utp to 2:00mm

16735400_692583600929018_1728613879_o


plastic wrap

A cardboard roll  or any hollow pipe cut to size to hold the shape of the basket

wood glue/quickfix/ a very strong starch spray

pins

To decorate the basket 

Ribbons/bows/satin flowers,buttons/stars etc

Pattern

Here there are 2 patterns…I am doing only the first one now. In this post since the pattern has been given in such detail, I am not going to write out each row…rather I have taken pics as I made this and have used them here to help you along.

16684309_690174354503276_1455415463340555184_n 16684133_690174557836589_6534422730975815833_n

Method:

Row 1:

3ch…then 23 dcs into a 5chain loop; ss.

16735692_692583677595677_509729778_o

Row 2:

3ch, dc in same space; dc; 2 dc in same space;,dc until end then ss.

16734934_692583757595669_1169060094_o


16709608_692583817595663_1959846583_o

Row 3:

Same as Row 2

16710303_692587134261998_1677407052_o

Row 4:

16732116_692587217595323_1109735256_o

16710542_692587180928660_1091504860_o

Row 5

16736653_692587254261986_602726464_n

Row 6: 

Once the required base is acquired….you need to get the basket to build upwards….so cut the thread and begin to hook in the back loop only.  The pic below is form the internet and not my own…but it will help illustrate what back loop and front loop is.


Rows 7  to 15:


Row 16:

Now from here on up to the 23rd row the top of the basket widens like a funnel…Follow the stick count carefully…

Row 17 to 23: Pls refer to the pattern above


Top Ruffle

Row 24 to 27: Please check the  pattern above…


Bottom Ruffle

Please check the pattern above…

Handle

Please check the pattern above…


Blocking

Use a mixture of  Fabric gum and quick fix….and paint it over the basket allowing the mixture to soak into the thread.

Folllow the instructions as above to shape the basket.

Add some pretty bows, buttons and flowers….fix the handle and You have a very pretty basket.

Crochet Indian Vegetable(Karela/BitterGourd)

Crochet Indian Vegetable Motif(Karela/BitterGourd)

We Indians just love our veggies…….and have thousands and thousands of recipes for each vegetable. Our ancient and traditional meals are wholly balanced with proteins, carbs, vitamins,minerals etc taken into consideration….they r definetely not the over spiced oily version that seems to be passed off as Indian cooking commercially.

http://healthbenefitsofeating.com/fruit/15-health-benefits-karela/

One veggie that is a great favourite and is full of nutrients is Karela or Pavakka(bitter gourd). Since there aren’t any crochet Karela to be found…I have just created a motif pattern for this wonderful all Indian veggie.

Materials used

Anchor #20 green

Hook #1.25mm

Abbreviations Used

ch – chain

sc – single crochet

dc – double crochet

ss – slip stitch

Pattern

Row 1

chain 4; 3dc into the first chain (4 stitches)

Row 2

3ch up, 1dc in same stitch(increase); 1 dc in the next 2 stitches; 2 dc into the last stitch(increase) (6 stitches)

Row 3

3ch up, 1dc in same stitch(increase); 1 dc in the next 4 stitches; 2 dc into the last stitch(increase) (8 stitches)

Row 4

3 ch up; dc in each of the following stitches (8 stitches)

Row 5

3 ch up;  decrease by one in the next 2 stitches; dc in dc; decrease by one in the next 2 stitches; dc in dc; dc in dc (6 stitches)

Row 6

3 ch up;decrease by one in the next 2 stitches;decrease by one in the next 2 stitches; dc in dc (4 stitches)

Cut the thread.

Now you need to make the ridges on the Karela..

Make a ss and join to the tip of the motif. We will be working on the top of the motif…working in a vertical line across the surface of the motif.

we will be making 3 ridge lines along the motif.

the pattern for the ridge line is….

ss, sc; hdc,hdc, sc, ss;

Repeat this until the end of the line…u don’t have to cut the thread…just make another ss and return along the next line to the other end and then one more time.

Now ss around the motif and when you reach the narrowest tip 2 chs; ss in the first ch (this creates a very thin and narrow tip) and continue ss until the rest of the motif.

Recipes for Karela

https://www.tarladalal.com/recipes-using-bitter-gourd-214

Damaru ( An Indian drum)

DAMARU(Shiva’s celestial drum)

16880857_699012616952783_1512829637_o

The damaru is very common throughout the Indian subcontinent. The damaru is known as a power drum, and when played, it is believed to generate spiritual energy. It is associated with the Hindu deity Shiva. It is believed that Sanskrit language was recognized by the drumbeats of the damaru (see Shiva Sutra for the sounds), and his performance of the cosmic dance of tandava. The damaru is used by itinerant musicians of all stripes, due to its small portable size.

For more information on the Damaru….Pls check out this blog post.

http:/http://www.hinduwebsite.com/hinduism/concepts/damaru.asp

I0fdb6d0f23312e5ee4d64f0e3be81cf0101170712_amazoncom-damaru-indian-music-instrument-percussion

Materials Required

#20 Anchor thread in – Off white, light beige and brown

Hook #1.25mm

2 plastic cirlces or rounds cut out of a palstic mat(can use old table mats)

Polyfibre for stuffing

Two med sized beads…of any texture or colour

Pattern

Make the base of the Damaru

Begin with the off white thread

Magic knot

First Round

sc into the magic knot ; ss

(total stitches 6)

When you hook in the scs remember to hook into both the loops of each sc.

workinback_zoom

Second Round

2 sc into each continue until end; ss

(total stitches 12)

Third Round

2 sc in first sc; 1sc in next; continue  end; ss

(total stitches 18)

Fourth Round

2 sc, 1 sc in each of the next 2 scs; continue until end; ss

(total stitches 24)

Fifth Round

2 sc, 1 sc in each of the next 3 scs; continue until end ; ss

(total stitches 30)

Cut the thread…and tuck it in.

We Now Begin the rim of the drum

 Add the light beige

 6th Round

2 sc, 1 sc in each of the next 4 scs; continue until end; ss

(total stitches 36)

7th Round

16931078_700065460180832_324601470_o 17015161_700065433514168_289564942_o

 Hook only in the front loop….until the end of the body of the damaru

images-6

1sc in each sc; until end; ss

(total stitches 36)

Cut the thread…and tuck it in.

Now we begin the body of the drum

Add the brown

8th Round

 Same as Round 7

(total stitches 36)

9th Round

 Same as Round 7

(total stitches 36)

Begin Decreasing

 10th Round

Reduce one sc every 4 stitches

(total stitches 30)

11th Round

Reduce 1 sc every 3 stitches

(total stitches 24)

12th Round

Reduce 1 sc every 2 stitches

(total stitches 18)

13th Round

 Reduce 1sc every 1sc

(total stitches 12)

14th Round

1 sc in each sc

(total stitches 12)

Now Begin the Increase

15th Round

  2sc in first sc; 1sc in next; continue until end ss

(total stitches 18)

16th Round

2 sc, 1 sc in each of the next 2 scs; continue until end; ss

(total stitches 24)

17th Round

 2 sc, 1 sc in each of the next 3 scs; continue until end; ss

(total stitches 30)

18th Round

 2 sc, 1 sc in each of the next 4 scs; continue until end; ss (total stitches 36)

19th & 20th Rounds

1 sc in each of the following sc

(total stitches 36)

Cut the brown thread…and tuck it in.

 We Now Begin the rim of the drum

 Add the light beige thread

21st Round

Same as round 20th

(total stitches 36)

Cut thread and finish off.

Cut two pastic  rounds slightly smaller than the bases you have made from the old plastic table mat .

Push one of these into the bottom of the damaru so that it stays firm and acts as a sturdy base.

Use enough Polyfibre to give the damaru some shape.

Make a second base and using a needle sew this base to the open portion of the damaru.

Now fix the second base onto the top of the opening of the damaru using a needle to sew it on.

Cut thread and tuck it in.

Now you have to make the thread of the damaru.

Using a needle create a zig zag stitch from one base of the damru to the other…..then turn the damru upside down and make another zig zag stitch the same way.

Fix two medium sized beads to a string and tie it in the middle of the damru..

Lo Behold…Bhagwan Shiva’s Damru is done….

16934126_699012656952779_194969537_n

Crochet Rose

Crochet Rose


13228100_557531977767515_1112957910_n

Crochet Chronicles:

Aren’t roses beautiful? I have yet to meet a person who doesn’t love this glorious genre of flowers. And this is seen in the profusion of patterns created and posted by so many talented crocheters . So today I thought let me make a little rose to go with the hairband that I posted here last week.  This pattern is a very simple one and a very popular one as well….

Materials Used:

Red Rose Thread #10

Hook : 1.5 mm

Tapestry needle

Method:

Depending on how big and how many layers you want your rose to be…Hook in chains in multiples of 3….each 3 chains represents a petal. I am making a little rose to fit in with the hair band that I made.

Hook in 39 chains plus 3. Total 42 chains.

Row 1:

3 ch, skip 3 chains and dc in 4th chain; *3ch, skip 3chains and dc in 4th chain*….continue ** until the end. what you get is a pattern like a ladder…….with 3 chain loops.


Row 2:

Now we create the petal on top  of first row.

chain up, sc,hdc, 6 dcs, hdc,sc in the first 3 chain loop created.  hook in *sc,hdc, 6 dcs, hdc,sc*  in the next 3 chain loop and continue until the end.13187647_557521214435258_794491675_n

13219972_557520837768629_240610930_n

Now, slowly roll the petals using the ladder part as the stem. Make sure that when you roll the petals around each other it forms not the shape of a rose. Use a tapestry needle to sew the stem and the inner petals in place so that it stays together.

13162127_557520844435295_704699376_n

And voila…You have a lovely little rose…:-)

13228100_557531977767515_1112957910_n

Here are some graphs to make roses uses different combinations of stitches in almost the same way.

crochet flower 46 crochet-flower-patterns-diagrams-craft-craft-6tsvetyi-kryuchkom-6-288x30073eeac1379aba76768baa0da84259d9a-2

Just to practice do try to make some of the other roses as well…..Enjoy yourselves..and above all ..Keep that smile on..Love and Hugs…:-)

Crochet Hair Band

Crochet Hair Band

13162484_557520747768638_1331203685_n

Crochet Chronicles:

I don’t have a little girl and I don’t have friends who have little  girls…..All my pal’s daughters, are all grown up and would throw a fit if I even mentioned hair bands…So I have had to use my thick skull as a measurement for this one…:-) Measure your little Princess’s head from the bottom of the left earlobe  all the way across to the bottom of the right earlobe.

Materials Needed for the Hair Band: 

Laura Kitting Cotton  in any color of your choice

Hook : 3:00mm

Nature’s Cotton Yarn

Hook : 2.5 mm

( I haven’t mentioned the amount of yarn required because it is really very minimal)

Elastic(optional) I have used satin ribbon. You can fix a piece of elastic ribbon to attach the two end of the hair band.

Pattern:

You can use any pattern that you wish in 1 or 2 rows to make that band. Since this blog post is for beginner’s I have used  half double crochet(hdc) and double crochet(dc)

Row 1

Make a chain of 75 plus 2. total 77 chains. The last 2 chains are the ones that will create one side of the hair band and will carry you to the next row.

DSC_0323

Row 2: 

hdc in every ch to the end, 3 chs up


13153321_556960644491315_774944942_n

Row 3:

dc in every hdc to the end, 2 chs up


13149848_556960667824646_276392058_n 13181171_556960684491311_1075983900_n

Row 4:

hdc in every dc to the end..cut the yarn and tuck the ends into the band.

13101106_556963301157716_1796644086_n13153356_556963281157718_68010802_n13162478_556963307824382_444923676_n

13141050_556963311157715_1188046337_n13150056_556963314491048_1144091352_n

Row 5:

The actually works all the way around except at the two ends…

 13152821_556964477824265_1403789979_n

13150056_556963314491048_1144091352_n

Add a thinner thread to create a lacey, shell effect around the hairband. I used Nature’s cotton yarn..with a 2.5mm hook.

add the yarn to the first hdc on one side.

3 ch, 2 dc, in the same hdc;

13180843_556964494490930_84368092_n 13153368_556964471157599_1779844791_n


Skip 2 hdc, ss into the third hdc,

*3 ch and 2dc into same hdc as ss

Skip 2 hdc, ss into the third hdc*.

Continue ** until end of row. then at the turn hook in hdc, 2ch, hdc; 2 ch hdc;

13140570_556964504490929_213241024_n 13140870_556964511157595_2120886034_n

13162022_556964517824261_1164126202_n 13181153_556964521157594_2018958719_n

Then, ss in hdc; then continue **, again at the turn – hook in hdc, 2ch; hdc, 2dc; hdc; ss.

Now attach the required lengths of ribbon/yarn / fabric to both the end of the band , so that you have equal lengths of these on both the sides so that you can tie it and the nape of the neck securing the hair band safely.

13187683_556966627824050_1296268189_n

Different ways to make the hairband even more beautiful.

I have used a ribbon and pulled it through the middle dcs of the hairband. You can make a crochet rose or a crochet heart  to accentuate this.

13162375_556966621157384_1164158613_n

13180931_556966631157383_150521590_n

13152731_557520761101970_624989609_n 13153357_557520764435303_557556134_n 13162056_557520771101969_2120427166_n

Try different things for e.g.; a crochet butterfly, or  a satin ribbon flower, a piece of metal jewelry , a brooch anything really….play with your imagination…:-)

There…wasn’t that easy to do? Using the same stitches you can change the pattern ..instead a block of dcs and hdcs you can create a ladder like pattern by hooking in chains in-between the dcs… You can make the hairband much wider or thinner. You can use beads. You will remember how we learnt to use beads and crochet in one of our first lessons.

I hope you practice and make a few hairbands…you can shorten the length of the hairband and use it as a choker ..would’t that be lovely?

Crochet Diamonds

How to Crochet  A Diamond Shape

DSC_9814

Crocheting the diamond shape is not challenging….you just need to understand the increase/decrease concept….but joining them to make a coherent and beautiful project is challenging. I have often thought that, you can’t do much with this shape in crochet until I saw Jellina’s crochet in geometric patterns. To say that she is a genius would be an understatement.

I have shown you 2 ways to do the diamond motif

Diamond Motif 1: Where you hook in a diamond using single crochet(scs)..this is the Jellina way

Diamond Motif 2: The Diamond is worked using double crochets(dcs)

Abbreviations:

Chain – ch
Single Crochet – sc
Stitch – st
Skip – sk
Yarn Over – yo
Double Crochet – dc

Diamond Motif 1

DSC_9767 (1)

Our first pattern for the diamond motif is made with single crochet stitches.

This pattern is from  the blog little Woolie….I have shared her link at the end of the page. I suggest that you go through her blog…She specialises in crochet diamonds and her work is Beautiful.

BASIC DIAMOND PATTERN

Begin With:

Ch 2

DSC_9754

Row 1: 2 sc into 2nd ch from hook, turn.

DSC_9759

Row 2:  Ch1(turning chain) 1sc into first st, 2sc into 2nd st, turn.

DSC_9760

Row 3: Ch1, 1sc into 1st st, 1sc into 2nd st, 2sc into last st, turn.

DSC_9761

Row 4: Ch1, 1sc into 1st st, 1sc into each st across until last st, 2sc into last st, turn.

DSC_9762

Repeat row 4 until you have  as many stitches as you like, more stitches means a bigger diamond . For this tutorial I have stopped with Row 4.

Start decreasing.
The decrease pattern is as follows:

Ch1, sk 1st st, sc into next st and each st across, turn. (reduces by 1 st in each row)

DSC_9764
Continue doing this to each row until you have 1 st left and fasten off.

DSC_9767 (1)

Here are some patterns using the sc.

How to crochet a diamond

http://www.jellina-creations.nl/blog/patroontje-ruit

http://www.ehow.com/how_8302223_crochet-diamond-section.html

How to crochet a diamond Afghan

http://www.jellina-creations.nl/blog/patroontje-ruit

How to crochet a diamond

Diamond Motif 2

Here, we hook in the diamond shape with double crochet stitches(dcs)

DSC_9814

These graphs are off the internet and I thought that they are very well illustrated.

10354626_955119107844314_534971897881269231_n

Begin with 4 chains

DSC_9771

Row 1:

dc into 4th chain from hook. Turn (2)

DSC_9772

Row 2:

3 Chain up, dc in same stitch; 2 dc in next stitch (4). Turn

DSC_9773

Row 3:

3 Chain up, dc in same stitch;  one dc in next 2 stitches; 2 dc in last stitch; (6). Turn

DSC_9779

Row 4:

3 Chain up, dc in same stitch; one dc in next 4 stitches; 2 dc in last stitch; (8). Turn

Row 5:

DSC_9780

3 Chain up, dc in same stitch; one dc in next 6 stitches; 2 dc in last stitch; (10). Turn

Depending on how big you want your diamond to be keep increasing the dcs in the beginning and end of each row. In the graph above the designer has gone up to 9 rows. I have stopped at Row 5.

What you have now is a triangle, in order to get a diamond shape and taper that end…we have to begin decreasing the dcs. Since we increased the dcs by 2 in each row to get this triangle…..we now have to reduce the dcs by 2 each row to get that diamond.

Decreasing the Stitches

Please Note…that from now on, you chain up by 2 at the beginning of each row

Row 1:

DSC_9781

2 chain up, dc in same stitch; dc in each of the next 8 stitches; 2 dc in the last stitch;(12). Turn.

Note that though I have mentioned decrease…in this row we have actually increased the stitches by 2….it’s just part of the pattern to get a smooth decrease.

Row 2:

DSC_9783 DSC_9787 DSC_9788 DSC_9789 DSC_9794 DSC_9793 DSC_9791 DSC_9790

2 chain up; dc in next stitch {( This works out like a dc 2 together and is a decreasing stitch), cos though you have put in 2 stitches…the effect is only one stitch…Just count the chains to confirm this};

dcs in the next 8 stitches;

dc in the 9th stitch…but do not complete the stitch …leave 2 loops on the hook and yarn over(yo), push your hook into the last stitch of the previous row, You have 4 loops on the hook, yo, reduce by 2, now you have 3 loops on the hook, yo and pull through all 2 loops.

Count your stitches and you will find that you have reduced the total count by 2……that is you have only 10 stitches now.

Row 3:

Continue as in Row 3…and you reduce the stitches by 2 getting 8 stitches.

Row 4:

Reduced by 2….6 stitches

DSC_9799

Row 5:

4 stitches

DSC_9800

Row 6:

2 stitches…and you are done..!!!

DSC_9807

Personally I prefer the dc method…it has more finesse…..but then each to her/his own.

Examples of Work using diamonds from the net:

A Diamond Baby Blanket

Made by http://solgrim.blogspot.ae/2015/02/harlequin-blanket.html?spref=piage Continue reading Crochet Diamonds