How to fix a lining for a semi circular crochet/knitted purse

How to fix a lining for a semi-circular Crochet  Clutch


Usually when you are making a semi- circular clutch either in fabric, crochet, knitting or any other material…the easiest way to do this is by creating or cutting out a round shape of the size that you want your clutch to be and folding it, thus getting a semi -circle shape.

Please Note that this tutorial caters to both…those who are using a canvas within the lining to give shape to the Clutch and those who just want a fabric lining. While you must go through the entire tutorial….All notes in Blue are for those who are only doing the fabric lining.

Once you have worked your round shape in  crochet…into the size you wish…


the next step is to fix the lining. Now linings can help in two ways

  1. To give the clutch a definite shape in case the crocheted round is not stiff
    (if you have made it in acrylic or any other soft yarn, or have not used the Mochila method of carrying yarn thus giving strength and shape to your work)

       2. To make the inside of your clutch look aestheically appealing and neat. You don’t want to be grappling with loose thread ends etc…becos the inside of your clutch will be your wrong side.

Now that you have finished your crochet work…..Lay it open on the table…if you need to starch it to make the shape hold or more stiff…do so now(this is if you are doing the work in thread)…but you don’t have to if you you have worked with a studier fibre.

I was at an exhibition in Pune recently and while conversing with a very talented crafter learnt that in India many ppl line their bags with jute material. Not only does it come cheap…it is also has an ethnic charm all of it’s own. It is also sturdy and doesn’t allow the finished work to flop about).

It is time to do the lining work…..

1.  Fold the lining material in half. Place your crochet Round on the Lining material.  There should be a 2 cms  extra material around the crochet round. So that after you mark and cut the fabric you have 2 fabric rounds.

( Remember if you are using a fabric with patterns on it…it is important to fold the material in such a manner that the wrong sides are facing each other and that the right side, is facing you.

If you are not using a canvas material to give shape to the clutch,

There is no need to fold the fabric,

Mark another cirlce by pencil just 2 cms away from the first circle,

…. then cut out just one fabric round….

And sew around the hem to give it a neat appearance. You can either use a sewing machine or you can sew it in by hand using the running stitch.

2. Using a fabric chalk or a pencil….mark a circle exactly around the crochet round on the fabric.

3. Now mark another circle concentric to the first one, 1 cms away. And then the third and most outer concentric circle another 1 cms away. Thus you have now marked out 3 concentric circles. Like is seen below….


4. Now cut the fabric along the outer most circle. Keep aside.

5.Now if you have made the work in acrylic or any soft yarn..you will need a sturdy piece of canvas….Place the crochet Round on the canvas and measure a cirlce 1.5 cms less than that of the crochet round. Cut along this circle.


(We make the canvas round slightly smaller because, the edge of the crohcet round will be needed to join the sides and also to attach the zip.

(The pics below are optional….. I have used a plastic table mat too along with the canvas becos my canvas isn’t stiff enough)


6. Place both fabric rounds right side together ..

Using either a sewing machine or by hand  (use running stitich) stitch together along the first concentric circle, around the  two rounds but only work 3/4ths of the way. You have now created a round fabric envelope.

Push in the round canvas and make it lie straight within the fabric envelope that you have created…Hand stitch the rest of the round together. Then stitch around outline of the canvas  in 2 circles slightly away form each other…This makes the canvas stay fit within the fabric envelope and is aestheticall appealing beocs the stitches will give the clutch a sharp edge when you fold it.

(The pics below are optional….. I have used a plastic table mat too along with the canvas becos my canvas isn’t stiff enough)


Once you have sewed the stiffening fabric(the canva) into the lining…fold it by half and pin it together all around the curve.

In the video below I explain the procedures to be followed –


Once you have pinned it sew inthe sides together to the length you think you need along the side. I have sewed in 10 cms on both sides, leaving the top portion open to fix the zip.

Here is another little video where how to fix the zip is explained….

Thus you have now done the lining for your clutch….

If you are not using a canvas you will fold and hem an edge around the fabric round,

Then, fold it and sew together both the sides.

you will sew in the zip as explained below

The next step is to fix the zip to the lining…

Place the zip across the top of the clutch.and fix the end of the zip, to the side of the fabric lining by sewing it in securely with a thick thread. Do not yet open the slider of the zip.

Once you have secured one end…..move the slider down the teeth of the zip so that you can place it on the excess fabric on either side of the mouth of the clutch.

Now sew in one side of the zip, say, the right side…when you reach the other side of the fabric lining move down until you reach to the closed edge. There you put both pieces of the zip together and sew it there securing the other end as well….


Then come back sewing along the left side securing the zip  to the fabric edge. Once you have fixed the zip. close the zip.


Fold you Crochet round in two… Join the sides on either side using single crochet.

Now push in the zippered lining into this crochet envelope that you have just created.

(Same procedure for those of you who re doing only the fabric lining)

Then, pull the crochet fabric tighly over the lining covering it completely except the zipper portion.


Zip

Using a thick thread sew and secure the crochet round to the lining fabric within.

Voila…you Stylish Crochet Clutch is ready!

The inside of your clutch….I haven’t yet hemmed in the excess fabric…..so when I am done it will be really neat….I will upload another pic in when I do….Right now I have to hurry to finish a CAL and make another liing tutorial without a canvas…just a fabric lining….with a zip.


Mochila Crochet – History

Mochila Crochet – History

(pic courtesy the internet)

Ever since I saw these intricately woven bags on the internet especially in crochet groups, I have been intrigued by them. Recently I took part in a CAL by Marion Verloop to learn ths technique. This tapestry technique is fascinating and so addictive that I lost no time in googling information about it.

History of the Mochila

The Wayuu is a  ethnic group of the Guajira Peninsula in northern Colombia and northwest Venezuela. The Wayuu people are a Matriarchal society and it is the women who weave the Mochila bags. Yes…it was first woven on looms and was a weaving technique.

Wayyu history says that their women were originally taught how to weave the bags and create the complex patterns that make up the design by the God  Wale Keru,who is symbolised by the Spider

Although the whole Arhuaco community is involved in production, only Wati (Arhuaco women) can weave the bags together according to custom. Traditionally, the women learn to weave from an early age by watching their mothers. When a girl first attains puberty she is kept isolated for 6 months or so. This is when she is taught to weave, to cook, to bring up children and all the chores that a woman must know.

The first mochila a woman makes is given to the priest for the rituals of the life cycle. A traditional Wayuu settlement is made up of five or six houses that made up caserios or rancherías. Each ranchería is named after a plant, animal or geographic place. A territory that contains many rancherias is named after the mother’s last name; that is, society is matrilineal. The Wayuu congregated in rancherias are usually isolated and far from each other to avoid mixing their goat herds.

Later as the Spanish conquered South America, the nuns introduced crochet to the Wayuu people, who ingeniously incorporated their magnificent heritage of Kanas(patterns) into creating these beautiful bags. Thus Mochila Crochet  was born.

Here while the woman make the bags it is the  Men who weave weave the straps…

Wayuu culture is known for crafts such as bags or mochilas. There are many styles of mochilas. A susu is a backpack typically 20cm-30cm wide and 35cm high, used to store personal and work items. Characteristic for the fabrics are the decorating patterns inspired by nature and what the culture sees around.

The colors with which the mochilas are woven are earth tones, ranging from brown and beige to black and gray. Normally a bag wil take from 20 days to 30 days to make.

Yarn used for the Mochila

Originally they were woven with natural fibers from the Arahuaco lands, such as agave and cotton. The Spanish introduced sheep’s wool and currently mochilas are made with cotton yarn  and industrial fibers.

You can also make the Mochila with cotton thread provided it is taken in double strength..that means 2 strands work as one. To make the normal  size you would probably have to double the number of rows as well.

How the Arahuaca People use the Mochila

Arhuaco men traditionally use three bags:

1. Chige Kwanu, to save personal belongings,

2. Zizhu, to carry cocoa leaves,

3. Another one for food storage or travel items.

They also used a fourth one called masi, to hold their poporo.

The women carry the tutu gawa made of agave. The tutu chakeai and jina kau (white, cotton, without drawings) are marunsama backpacks or mamu (spiritual sage of the arhuaco).

When a man and woman will marry, the future wife weaves two bags, one for her and one for her husband, to symbolize the love of the couple.

Meaning of Mochila

The Mochila Arhuaca, or tutu iku in Ika, is a popular Colombian artisan bag made by the Arhuaco people of the Sierra Nevada.

In Spanish it means A knapsack, Back pack, Haver sack or a Saddle Pouch,

Thus Mochila Arahuaca simply means a backpack of the Arahuaca people.

In the olden times, the Spanish who had invaded South America used these bags as saddle bags to carry the mail on ponies. It was a square leather saddle covering having openings for the horn and cantle and sometimes equipped with saddlebags. Many riders and even more ponies carried the mail, but only the mochila made the entire trip.

Mochila Technique

Is basically Single crochet, but in a slightly different manner….so that we now call it the Modified Single Crochet ..this is used extensively in tapestry crochet and Mochila crochet and helps to define geometric figures especially straight lines.

  1. You crochet only in the back loop
  2. You first crochet Yarn Over(YO) then you have two loops on your hook
  3. Then you crochet Yarn Under(YU) …and pull the yarn through both the loops completing the Modified single crochet stitch.

Significance of the Kanas or Patterns

A Kanas or a pattern in Mochila technique signifies many things…usually it pertains to the woman who is weaving the bag. It could be her perception of her life or the life around her. Certain tribes or villages have their own distinct patterns. So a Kanas is not an arbitrary design. It is well thought out and is a cultural as well as a personal emblem for the Wayuu people. Patterns have different names, including Molokonoutaya, Pulikerüüya, Pasatalo’ouya, Marüliunaya, Antajirasüyaa and many more.

The bags usually carry indigenous drawings or representations of animals and other objects of their cosmology. Each design identifies families, some of the most important are:

the gamako (the frog), the symbol of fertility,

the zikamu (the centipede),

the aku (the rattlesnake),

which symbolizes time and space,

Peynu (the comb),

Kutia (ribs),

Kaku serankua (the creator of the Sierra father),

Makuru (the vulture),

Gwirkunu (the hills and lakes), urumu (the snail),

Sariwuwu (the months of pregnancy),

Kunsamunu a’mia (the thought of women),

Kunsamunu cheyrua (human thought),

Kanzachu (tree leaf),

Chinuzatu (the four corners of the world),

Kambiru (scorpion tail or scribble),

Phundwas (the snowy peaks of the Sierra)

Garwa (the father of the roads).

Types of Kanas or Patterns

Each mochila is different because of its colors, patterns, and thread tension. However, there are certain patterns that have recognized names within the community. Wayuu patterns derive from traditional designs called kaanás (weaving drawing). Kaanás are generally geometric compositions that repeat throughout the making interconnected patterns, each of which receives a name that expresses its meaning.

Do check out the link below….to understand the different type of patterns.

https://wayuu-mochila-bags.com/about-us/blog/faqs-wayuu-mochila-bags/wayuu-patterns/

I do hope this post answers your basic queries on Mochila Crochet.


Crochet Pyramid Bag


Crochet Pyramid Bag

Introducing… The Pyramid Bag.. a long time Ago, I was thinking of making 3 triangular pouches from a pattern on the internet.. This was made by joining 2 Triangle crochet pieces together.. though I made 6 pieces .. 2 in each colour combo.. I got interested in other projects and this became another basket WIP….

Yesterday I pulled them out and made one simple traingular pouch.. but wanted to do something different with the rest.. so Lo behold … The Pyramid bag.. got 4 triangular pieces( I made 2 more for this one in the same combination) used old plastic table mats inside the lining of the bag to give shape and definition.. fixed a zipper, a wooden beaded handle and a base with wooden beads. When I posted ths in my group…..the response was tremendous….Some of the lovely gals there wanted me to create a CAL and share how I lined the bag to give it shape…

Though I am not going to make this purse again…I thought..I will write and by a small pic tutorial show how I did the lining..  .

Size Of the bag: 

Is 16 cms in height and as this is an equilateral Triangle the width is 16cms.

Material Used:

Yarn:

Nature’s Cotton Yarn from Soft Feather

Hook Size:

3:00mm

Lining:

A plastic table mat , or thick canvas, or any material that is flexible, you can cut into shape..may be used beneath the lining.

Lining material approx half a metre…

Method:

Make 4 equilateral triangles ..that is 4 triangles where the 3 sides are of the same length. All the 4 triangle should be of the same size and shape( I say shape becos sometimes in corchet we have triangle patterns where the 3 points may be rounded). Whichever pattern you use…for the triangles….make sure the size used is the same for all 4.

Pattern:

I have written out the first 2 rounds for those who may find it difficult….

Pattern for a triangle

Make a magic circle

Round 1: Into the magic circle .. hook in 3 ch, 2dc; 2ch; 6dc; 2ch; 6dc; 2ch; 3dc; ss

Round 2:
3ch up, 4dc; 2ch; 10dc; 2ch; 10ch; 2ch; 5dc; ss

For those who find it difficult to read a crochet graph pls do check this link….

https://crochetnmore.wordpress.com/2014/08/11/how-to-read-a-crochet-pattern-1/


 Lining:

After you hook in the 4 crochet triangles….you can accessorise it with beads/ribbons/tassels, sequences  etc…or you can wait until all the pieces have been joined.

Cut out 4 triangles out of the plastic mat at a slightly smaller size than the triangles.

(The pic below is just an example and not in original size)

Then placing the lining material in front of you fold it into half(making sure the ‘right’ sides are facing each other)…place the plastic triangle on top of the material and then using a cloth marker pen or a pencil or fabric chalk….mark out  an outline around the triangle.This first outline is the size we require…this is the outline we will stitch on. So let us call it outline A

Then measure half an inch from that outline and mark out an outline around the triangle half an inch away from the original outline. This second and most external outline is the one we will cut …so that now you have an excess of half an inch around the original triangle. We will call this B

Now cut along B and seperate this piece from the main material…you will now have 2 triangular fabric pieces of the same size.

(The pic below is just an example and not in original size)

Now stitch along 2 sides of outline A….keeping 2 triangle pieces together.

Then pull the triangle inside out…This is make the stitched part go inside and then place the plastic triangle inside and inbetween the triangular envelope that you have just created.

Then sew in the 3rd side and close it up.

Repeat with the other 3 triangles.

Now place each of fabric lined triangles on each of the crochet triangles and stitch it on to them. Thus you now have 4 lined crochet triangles.

Alternately you can also join all the 4 lined triangles to create a bag…Join all the crochet triangles seperately to create another bag. Then place the lined triangle bag inside the crochet triangle bag and sew the lined bag onto the crochet bag.

Joining the Triangles to form a Pyramid

 Join all the four lined triangles by placing one triangle in the centre, and the other 3 facing each of the centre triangle’s sides. So that each side of the centre triangle should be aligned with that of each of the other triangles.

(The pic below is just an example and not in original size) 

Join the sides of the triangle using single crochet(sc) but make sure that you leave one side  unjoined. On this side you have 2 lips…….do half double crochet(hdc) along both the lips. This is your bag’s opening…..where you fix your zip.

 Join the sides of the triangle using single crochet(sc) but make sure that you leave one side  unjoined. On this side you have 2 lips…….do half double crochet(hdc) along both the lips. This is your bag’s opening…..where you fix your zip.

Sew the zip by first fixing both ends by pins to the lip opening corners of the purse. Once it is fixed….sew in the zip to the lip around the opening. Cut away the excess length of the zip.

You can see the zip below….

Below is how the bag looks from the top…an aerial view…. You can make any type of handle or get a ready made one….I made a handle out of wodden beads…..and then used smaller wooden beads around the base of the bag.


And there you go…..One lovely Pyramid Bag….You can really play with this…use a thinner thread and create a lacey effect…..ofcourse you will make to hook in a few more rounds…..crochet it in with beads, and tassels, use an i-cord or a beaded i-cord….Use can place the opening in a different manner….Perhaps you can open up an entire side and fix a long zip around the opening….There is just so much you can do with this pattern….Go where your creativity takes you and have a lot of fun with…Hugs!

Shree Ganesha C2C Graphghan

Shree Ganesha C2C Graphghan

(Please Note this Pattern has not been tested)

Here…I have used an abstract painting of Bhagawan Ganesha. It’s a one line painting and one I am extremely fond of. The simplicity and the hands that drew this one really astounds me. However turning this into a C2C graph wasn’t all that easy. The Crown and the Tilak just did not come out right when I put the painting through the graph soft ware. So I had to graph those two areas separately.

If you find some mistake in this written pattern please do let me know.

Materials Used

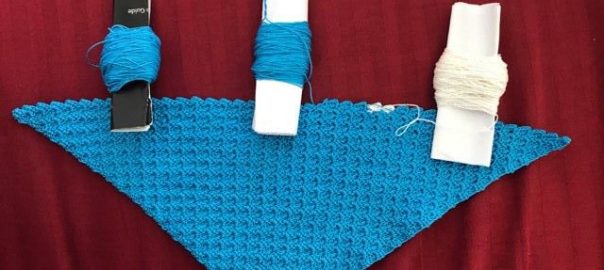
#10 Red Heart Thread – 200 grams

Red Rose Metallic in White – 60 gms

Hook:

#1:25mm

Abbreviations:

I have hooked this in mini C2C…that is in Half Double Crochet

ch – chain

Hdc – Half double chain

ss – slip stitch


C2C( Croner to Corner)

  1. Chain 5,

hdc in the 3rd chain from hook,

then one hdc in each of the next two chains

This is one block or cluster.

Turn over.

chain 5,

Repeat 1

then, ss in the 2 chain space of the first block,

2 ch; 3  hdc in the same chain space,

you have your second block….Turn over

Repeat as above.


Things to Remember while doing a C2C

  1. Always keep count…that is very important….at every step make sure the number of steps tally to the counter of blocks given in the pattern. Once you finish a row…recount the total number of blocks in each colour in that row and tally the total blocks. Proceed only when the tally is exact.
  2. Refrain from being distracted by watching TV, Internet etc.(just my suggestion, I learnt this the hard way..:-))
  3. Keep the graph and the written instructions in front of you at all times.
  4. I carry yarn only for upto 3 blocks….anything more than while using dc or hdc I find shows the carryign thread esp if it  is of a birght or  contrasting colour shows through.  In tapestry it is easy to carry the colours forward beocs the scs are short stitiches and does no tallow the carrying thread show.
  5. By making shuttles of each colour…I simply add  a new colour as and when the colour needs to be used after three blocks.  Below please go thorugh the link which wI use to keep the yarn’thread from tangling.

How to keep your yarn from getting tangled

To know how to keep your yarn from getting tangled please check my post on the same at the link below.

http://https://crochetnmore.wordpress.com/category/tutorials/

Graph

I cut the sides of the graph so that we get 61/107…where 61 is the width ( one square is equal to 1 block) and 107 is the length.

As always there are a few variant picots which I have swept away or added to ….so that the final picture looks complete….

This is how I have done the crown by hand and the mark on the forehead…..So when you are following the graph….when you reach this part you need to follow the hand graph.

Pattern

Begin from the bottom right side corner……

Increasing Rows

Row 1 (L to R): (Blue) x1, (1 Block)

Row 2 (R to L): (Blue) x2, (2 Blocks)

Row 3 (L to R): (Blue) x3, (3 Blocks)

Row 4 (R to L): (Blue) x4, (4 Blocks)

Row 5 (L to R): (Blue)x5, (5 Blocks)

Row 6 (R to L): (Blue) x6, (6 Blocks)

Row 7 (L to R): (Blue) x7, (7 Blocks)

Row 8 (R to L): (Blue) x8, (8 Blocks)

Row 9 (L to R): (Blue) x9, (9 Blocks)

Row 10 (R to L): (Blue) x10, (10 Blocks)

Row 11 (L to R): (Blue) x11, (11 Blocks)

Row 12 (R to L): (Blue) x12, (12 Blocks)

Row 13 (L to R): (Blue) x13, ( 13 Blocks)

Row 14 (R to L):(Blue) x14, ( 14 Blocks)

Row 15 (L to R):  (Blue)x15, ( 15Blocks)

Row 16 (R to L): (Blue) x16, (16  Blocks)

Row 17 (L to R): (Blue) x17, ( 17 Blocks)

Row 18 (R to L): (Blue) x18, ( 18 Blocks)

Row 19 (L to R): (Blue) x19, ( 19 Blocks)

Row 20 (R to L): (Blue) x20, ( 20 Blocks)

Row 21 (L to R): (Blue) x21, ( 21 Blocks)

Row 22 (R to L): (Blue) x22( Blocks)

Row 23 (L to R): (Blue) x23, ( 23 Blocks)

Row 24 (R to L): (Blue) x24, (24 Blocks)

Row 25 (L to R): (Blue) x25, ( 25 Blocks)

Row 26 (R to L): (Blue) x26, (26 Blocks)

Row 27 (L to R): (Blue) x27, ( 27Blocks)

Row 28 (R to L): (Blue) x28, ( 28Blocks)

Row 29 (L to R): (Blue) x29, (29 Blocks)

Row 30 (R to L): (Blue)x30,  (30 Blocks)

Row 31 (L to R): (Blue) x31, (31 Blocks)

Row 32 (R to L): (Blue)x32,  (32 Blocks)

Row 33 (L to R): (Blue) x31, (33 Blocks)

Row 34 (R to L): (Blue)x32,  (34 Blocks)

Row 35 (L to R): (Blue) x, (35 Blocks)

Row 36 (R to L): (Blue)x,  (36 Blocks)

Row 37 (L to R): (Blue) x, (37 Blocks)

Row 38 (R to L): (Blue)x,  (38 Blocks)

Row 39 (L to R): (Blue) x, (39 Blocks)

Row 40 (R to L): (Blue)x40,  (40 Blocks)

Row 41 (L to R): (Blue) x27, ( White) x1, (Blue) x13, (41 Blocks)

Row 42 (R to L): (Blue) x13,( White) x2, (Blue) x27, (42 Blocks)

Row 43 (L to R): (Blue) x28, ( White) x1, (Blue) x14, (43 Blocks)

Row 44 (R to L): (Blue)x15, ( White) x2,  (Blue) x27, (44 Blocks)

Row 45 (L to R): (Blue) x28, ( White) x2, (Blue) x15, (45 Blocks)

Row 46 (R to L): (Blue)x16, ( White) x2, (Blue) x28, (46 Blocks)

Row 47 (L to R): (Blue) x47, (47 Blocks)

Row 48 (R to L): (Blue)x18,( White) x2, (Blue) x28, (48 Blocks)

Row 49 (L to R): (Blue) x28, ( White) x3, (Blue) x18, (49 Blocks)

Row 50 (R to L): (Blue)x19,( White) x2, (Blue) x29, (50 Blocks)

Row 51 (L to R): (Blue) x30,( White) x2, (Blue) x19, (51 Blocks)

Row 52 (R to L): (Blue)x20,( White) x1, (Blue) x31, (52 Blocks)

Row 53 (L to R): (Blue) x32, ( White) x1, (Blue) x20, (53 Blocks)

Row 54 (R to L): (Blue)x54,  (54 Blocks)

Row 55 (L to R): (Blue) x27, ( White) x1, (Blue) x3,( White) x1, (Blue) x23, (55 Blocks)

Row 56 (R to L): (Blue)x24,( White) x1, (Blue) x2,( White) x3, (Blue) x26, (56 Blocks)

Row 57(L to R): (Blue) x19, ( White) x10, (Blue) x2,( White) x2, (Blue) x24,(57 Blocks)

Row 58(R to L): (Blue)x25, ( White) x2, (Blue) x3,( White) x9, (Blue) x19,(58 Blocks)

Row 59(L to R): (Blue) x18,( White) x4, (Blue) x1,( White) x4, (Blue) x4, (White)x2; (Blue)x26,  (59 Blocks)

Row 60 (R to L): (Blue)x27,( White) x3, (Blue) x9,( White) x3, (Blue) x18, (60 Blocks)

Decreasing One Side


Row 61 (L to R): (Blue)x18,  (White) x2, (Blue) x3, (White) x10, (Blue) x 27, (61 Blocks)

Row 62 (R to L): (Blue)x18,  (White) x2, (Blue) x3, (White) x10, (Blue) x 27, (60 Blocks)

Row 63 (L to R): (Blue)x18,  (White) x2, (Blue) x3, (White) x10, (Blue) x 27, (60 Blocks)

Row 64 (R to L): (Blue)x18,  (White) x2, (Blue) x3, (White) x10, (Blue) x 27, (60 Blocks)

Row 65 (L to R): (Blue)x18,  (White) x2, (Blue) x3, (White) x10, (Blue) x 27, (60 Blocks)

Row 66 (R to L): (Blue) x36,  (White) x2, (Blue) x2, (White) x2, (Blue) x18 , (60 Blocks)

Row 67 (L to R): (Blue) x19,  (White) x1, (Blue) x2, (White) x2, (Blue) x36 , (60 Blocks)

Row 68 (R to L): (Blue) x36,  (White) x2, (Blue) x1, (White) x2, (Blue) x19, (60 Blocks)

Row 69 (L to R): (Blue) x19,  (White) x2, (Blue) x1, (White) x2, (Blue) x36, (60 Blocks)

Row 70 (R to L): (Blue) x36,  (White) x2, (Blue) x1, (White) x2, (Blue) x19, (60 Blocks)

Row 71 (L to R): (Blue) x20,  (White) x1, (Blue) x2, (White) x1, (Blue) x36, (60 Blocks)

Row 72 (R to L): (Blue) x35,  (White) x2, (Blue) x1, (White) x1, (Blue) x20, (60 Blocks)

Row 73 (L to R): (Blue) x20,  (White) x2, (Blue) x1, (White) x2, (Blue) x35, (60 Blocks)

Row 74 (R to L): (Blue) x34,  (White) x2, (Blue) x2, (White) x2, (Blue) x21, (60 Blocks)

Row 75 (L to R): (Blue) x21,  (White) x2, (Blue) x1, (White) x2, (Blue) x34, (60 Blocks)

Row 76 (R to L): (Blue) x34,  (White) x1, (Blue) x2, (White) x2, (Blue) x21, (60 Blocks)

Row 77 (L to R): (Blue) x22,  (White) x1, (Blue) x2, (White) x2, (Blue) x33, (60 Blocks)

Row 78 (R to L): (Blue) x33,  (White) x1, (Blue) x2, (White) x2, (Blue) x22, (60 Blocks)

Row 79 (L to R): (Blue) x16,  (White) x2, (Blue) x4, (White) x2, (Blue) x2, (White) x2, (Blue) x22, (60 Blocks)

Row 80 (R to L): (Blue) x22,  (White) x2, (Blue) x2, (White) x2, (Blue) x4, (White) x5, (Blue) x1, (White) x2, (Blue) x10, (60 Blocks)

Row 81 (L to R): (Blue) x10,  (White) x7, (Blue) x5, (White) x3, (Blue) x1, (White) x2, (Blue) x32,  (60 Blocks)

Row 82 (R to L):(Blue) x31,  (White) x2, (Blue) x2, (White) x3, (Blue) x5, (White) x7, (Blue) x10,  (60 Blocks)

Row 83 (L to R): (Blue) x10,  (White) x6, (Blue) x7, (White) x2, (Blue) x3, (White) x1, (Blue) x10,  (60 Blocks)

Row 84 (R to L):(Blue) x30,  (White) x2, (Blue) x2, (White) x2, (Blue) x12, (White) x2, (Blue) x10,  (60 Blocks)

Row 85 (L to R): (Blue) x11,  (White) x1, (Blue) x12, (White) x2, (Blue) x3, (White) x1, (Blue) x30,  (60 Blocks)

Row 86 (R to L):(Blue) x29,  (White) x2, (Blue) x3, (White) x2, (Blue) x11, (White) x2, (Blue) x11,  (60 Blocks)

Row 87 (L to R): (Blue) x12,  (White) x1, (Blue) x12, (White) x1, (Blue) x3, (White) x2, (Blue) x29,  (60 Blocks)

Row 88 (R to L):(Blue) x28,  (White) x2, (Blue) x3, (White) x2, (Blue) x11, (White) x2, (Blue) x12, (60 Blocks)

Row 89 (L to R): (Blue) x13,  (White) x1, (Blue) x11, (White) x2, (Blue) x3, (White) x2, (Blue) x28,  (60 Blocks)

Row 90 (R to L):(Blue) x27,  (White) x3, (Blue) x3, (White) x2, (Blue) x10, (White) x2, (Blue) x13,  (60 Blocks)

Row 91 (L to R): (Blue) x14,  (White) x2, (Blue) x9, (White) x2, (Blue) x4, (White) x3, (Blue) x26,  (60 Blocks)

Row 92 (R to L): (Blue) x26,  (White) x3, (Blue) x4, (White) x2, (Blue) x8, (White) x2, (Blue) x15,  (60 Blocks)

Row 93 (L to R): (Blue) x15,  (White) x3, (Blue) x7, (White) x2, (Blue) x5, (White) x2, (Blue) x26,  (60 Blocks)

Row 94 (R to L): (Blue) x27,  (White) x2, (Blue) x4, (White) x3, (Blue) x6, (White) x2, (Blue) x16,  (60 Blocks)

Row 95 (L to R): (Blue) x17,  (White) x3, (Blue) x4, (White) x3, (Blue) x4, (White) x2, (Blue) x27,  (60 Blocks)

Row 96 (R to L): (Blue) x26,  (White) x2, (Blue) x5, (White) x10, (Blue) x17, (60 Blocks)

Row 97 (L to R): (Blue) x18,  (White) x9, (Blue) x2, (Red)x1, (Blue) x2, (White) x2, (Blue) x26,  (60 Blocks)

Row 98 (R to L): (Blue) x26,  (White) x2, (Blue) x2, (Red)x2, (Blue) x1, (White) x8, (Blue) x19,  (60 Blocks)

Row 99 (L to R): (Blue) x21,  (White) x4, (Blue) x2, (Red)x1, (Blue) x1, (Red) x1, (Blue) x2, (White) x2, (Blue) x26,  (60 Blocks)

Row 100 (R to L): (Blue) x26,  (White) x2, (Blue) x1, (Red)x1, (Blue) x1, (Red) x1, (Blue) x28, (60 Blocks)

Row 101 (L to R): (Blue) x28, (Red)x1, (Blue) x1, (Red) x1, (Blue) x1, (White) x2,(Blue) x26, (60 Blocks)

Row 102 (R to L): (Blue) x26,  (White) x2, (Blue) x1, (Red)x1, (Blue) x30, (60 Blocks)

Row 103(L to R): (Blue) x30, (Red)x1, (Blue) x1, (White) x2, (60 Blocks)

Row 104(R to L): (Blue) x26, ( White) x2,  (Blue) x8, (White) x1, (Blue) x23, (60 Blocks)

Row 105 (L to R): (Blue) x23, (White) x2, (Blue) x8, (White)x2, (Blue) x5, (White) x1,  (Blue) x19, (60 Blocks)

Row 106 (R to L): (Blue) x19, (White) x1, (Blue) x5, (White)x2, (Blue) x7, (White) x2,  (Blue) x24, (60 Blocks)

Row 107 (L to R): (Blue) x25, (White) x2, (Blue) x6, (White)x2, (Blue) x5, (White) x1,  (Blue) x19, (60 Blocks)

Decreasing on Both Sides

Row 108 (R to L): (Blue) x18, (White) x2, (Blue) x5, (White)x1, (Blue) x6, (White) x2,  (Blue) x25, (59 Blocks)

Row 109 (L to R): (Blue) x22, (White) x1, (Blue) x1, (White)x2, (Blue) x5, (White) x2,  (Blue) x5, (White) x1,  (Blue) x17, (58 Blocks)

Row 110 (R to L): (Blue) x18, (White) x1, (Blue) x5, (White)x2, (Blue) x4, (White) x2,  (Blue) x1, (White) x2,  (Blue) x17, (57 Blocks)

Row 111 (L to R): (Blue) x22, (White) x2, (Blue) x1, (White)x2, (Blue) x4, (White) x2,  (Blue) x4, (White) x2,  (Blue) x17, (56 Blocks)

Row 112 (R to L): (Blue) x17, (White) x1, (Blue) x5, (White)x2, (Blue) x3, (White) x2,  (Blue) x1, (White) x2,  (Blue) x22, (55 Blocks)

Row 113 (L to R): (Blue) x20, (White) x1, (Blue) x1, (White)x2, (Blue) x1, (White) x2,  (Blue) x3, (White) x2,  (Blue) x5, (White) x2,  (Blue) x16, (54 Blocks)

Row 114 (R to L): (Blue) x16, (White) x2, (Blue) x4, (White)x1, (Blue) x3, (White) x2,  (Blue) x1, (White) x2,  (Blue) x1, (White) x2,  (Blue) x19, (53 Blocks)

Row 115 (L to R): (Blue) x19, (White) x2, (Blue) x1, (White)x2, (Blue) x1, (White) x2,  (Blue) x2, (White) x2,  (Blue) x4, (White) x1,  (Blue) x16, (52 Blocks)

Row 116 (R to L): (Blue) x15, (White) x2, (Blue) x3, (White)x2, (Blue) x3, (White) x2,  (Blue) x1, (White) x2,  (Blue) x1, (White) x2,  (Blue) x18, (51 Blocks)

Row 117 (L to R): (Blue) x18, (White) x1, (Blue) x1, (White)x2, (Blue) x1, (White) x1,  (Blue) x5, (White) x2,  (Blue) x3, (White) x1,  (Blue) x15, (50 Blocks)

Row 118 (R to L): (Blue) x14, (White) x2, (Blue) x1, (White)x4, (Blue) x7, (White) x2,  (Blue) x1, (White) x2, (Blue) x16, (49 Blocks)

Row 119 (L to R): (Blue) x15,  (White)x3, (Blue) x1, (White) x1,  (Blue) x8, (White) x7, (Blue) x13, (48 Blocks)

Row 120 (R to L): (Blue) x13, (White) x5, (Blue) x11,  (White) x3, (Blue) x15, (47 Blocks)

Row 121 (L to R): (Blue) x15, (White) x3, (Blue) x12,  (White) x4, (Blue) x12, (46 Blocks)

Row 122 (R to L): (Blue) x12, (White) x1, (Blue) x15,  (White) x2, (Blue) x15, (45 Blocks)

Row 123 (R to L): (Blue) x44, (44 Blocks)

Row 124 (L to R): (Blue) x43, (43 Blocks)

Row 125 (R to L):(Blue) x42, (42 Blocks)

Row 126 (L to R):(Blue) x41, (41 Blocks)

Row 127 (R to L): (Blue) x40, (40 Blocks)

Row 128 (L to R): (Blue) x39, (39 Blocks)

Row 129 (R to L): (Blue) x38, (38 Blocks)

Row 130 (L to R): (Blue) x37, (37 Blocks)

Row 131 (R to L): (Blue) x36, (36 Blocks)

Row 132 (L to R): (Blue) x35, (35 Blocks)

Row 133 (R to L): (Blue) x34, (34 Blocks)

Row 134 (L to R): (Blue) x33, (33 Blocks)

Row 135 (R to L): (Blue) x32, (32 Blocks)

Row 136 (L to R): (Blue) x31, (31 Blocks)

Row 137 (R to L): (Blue) x30, (30 Blocks)

Row 138 (L to R): (Blue) x29, (29 Blocks)

Row 139 (R to L): (Blue) x28, (28 Blocks)

Row 140 (L to R): (Blue) x27, (27 Blocks)

Row 141 (R to L): (Blue) x26, (26 Blocks)

Row 142 (L to R): (Blue) x25, (25 Blocks)

Row 143 (R to L): (Blue) x24, (24 Blocks)

Row 144 (L to R): (Blue) x23, (23 Blocks)

Row 145 (R to L): (Blue) x22, (23 Blocks)

Row 146 (L to R): (Blue) x21, (21 Blocks)

Row 147 (R to L): (Blue) x20, (20 Blocks)

Row 148 (L to R): (Blue) x19, (19 Blocks)

Row 149 (R to L): (Blue) x18, (18 Blocks)

Row 150 (L to R): (Blue) x17, (17 Blocks)

Row 151 (R to L): (Blue) x16, (16 Blocks)

Row 152 (L to R): (Blue) x15, (15 Blocks)

Row 153 (R to L): (Blue) x14, (14 Blocks)

Row 154 (L to R): (Blue) x13, (13 Blocks)

Row 155 (R to L): (Blue) x12, (12 Blocks)

Row 156 (L to R): (Blue) x11, (11 Blocks)

Row 157 (R to L): (Blue) x10, (10 Blocks)

Row 158 (L to R): (Blue) x9, (9 Blocks)

Row 159 (R to L): (Blue) x8, (8 Blocks)

Row 160 (L to R): (Blue) x7, (7 Blocks)

Row 161 (R to L): (Blue) x6, (6 Blocks)

Row 162 (L to R): (Blue) x5, (5 Blocks)

Row 163 (R to L): (Blue) x4, (4 Blocks)

Row 164 (L to R): (Blue) x3, (3 Blocks)

Row 165 (R to L): (Blue) x2, (2 Blocks)

Row 166 (L to R): (Blue) x1, (1 Blocks)

There you are …..Our Ganpathy Bapa Moriya!!! All DONE!!


‘OM’….C2C Graphghan

‘OM’….C2C Graphghan

(The Written Pattern Has Not Been Tested)

‘OM’ is the pranavamantram…..which means it is the primordial sound…the first sound ever heard in the universe. If you go into space…it isn’t silent….there is this sound like the wind blowing past nothingness ……the sound is OOOOOOMMMM……and this is why it is considered as the first sound ever heard.

In Hinduism, Om is one of the most important spiritual symbols (pratima). It refers to Atman (soul, self within) and Brahman (ultimate reality, entirety of the universe, truth, divine, supreme spirit, cosmic principles, knowledge). The syllable is often found at the beginning and the end of chapters in the Vedas, the Upanishads, and other Hindu texts.It is a sacred spiritual incantation made before and during the recitation of spiritual texts, during puja and private prayers, in ceremonies of rites of passages (sanskara) such as weddings, and sometimes during meditative and spiritual activities such as Yoga.

Om is part of the iconography found in present and ancient and medieval era manuscripts, temples, ashrams and spiritual retreats in Hinduism, and  religions that grew from Hinduism like Buddhism, and Jainism. The symbol has a spiritual meaning in all Indian dharmas, but the meaning and connotations of Om vary between the diverse schools within and across the various traditions.

The syllable is also referred to as omkara (ओंकार, oṃkāra), aumkara (औंकार, auṃkāra), and pranava (प्रणव, praṇava).

Abreviations:

ss – slip stitch

ch – chain

hdc – half double crochet

dc – double crochet

Size:

Using dc and Nature’s cotton yarn + 3:00mm hook  –  22″/20″

Gauge:

Using dc and Nature’s cotton yarn + 3:00mm hook – 2 blocks = 1″

Using hdc and Anchor #20 + 1.25mm – 4 blocks = 1″

Materials:

Nature’s Cotton from Soft Feather –  Beige – 300gms

Nature’s Cotton from Soft Feather – Red – 300gms

Anchor #20 in any two colours

Hook : 3:00mm/1:25mm

Laundry clips. 5 or 6

Things to Remember while doing a C2C

  1. Always keep count…that is very important….at every step make sure the number of steps tally to the counter of blcoks given in the pattern. Once you finish a row…recount the total number of blocks in each colour in that row and tally the total blocks. Proceed only when the tally is exact.
  2. Refrain from being distracted by watching TV, Internet etc.(just my suggestion, I learnt this the hard way..:-))
  3. Keep the graph and the written instructions in front of you at all times.
  4. I carry yarn only for upto 3 blocks….anything more than while using dc or hdc I find shows the carryign thread esp if it  is of a birght or  contrasting colour shows through.  In tapestry it is easy to carry the colours forward beocs the scs are short stitiches and does no tallow the carrying thread show.
  5. By making shuttles of each colour…I simply add  a new colour as and when the colour needs to be used after three blocks.  Below please go thorugh the link which wI use to keep the yarn’thread from tangling.

    How To Keep the Yarn/Thread from tangling…

    Check this link to see how to keep the yarn lines clean and tidy

http://https://crochetnmore.wordpress.com


Graph:

(From the Internet)

Written Pattern:

Row 1 (L to R): (Beige) x1, (1block)

 Row 2 (R to L): (Beige) x2, (2blocks)

Row 3 (L to R): (Beige) x3, (3blocks)

Row 4 (R to L): (Beige) x4, (4 blocks)

Row 5 (L to R): (Beige)x5, (5blocks)

Row 6 (R to L): (Beige) x6, (6 blocks)

Row 7 (L to R): (Beige) x7, (7 blocks)

Row 8 (R to L): (Beige) x8, (8 blocks)

Row 9 (L to R): (Beige) x9, (9 blocks)

Row 10 (R to L): (Beige) x10, (10 blocks)

Row 11 (L to R): (Beige) x11, (11 blocks)

Row 12 (R to L): (Beige) x5, (Red) x4, (Beige) x3, (12 blocks)

Row 13 (L to R): (Beige) x2, (Red) x7, (Beige) x4, (13 blocks)

Row 14 (R to L): (Beige) x4, (Red) x9, (Beige) x1, (14 blocks)

Row 15 (L to R): (Beige) x1, (Red) x9, (Beige) x5, (15 blocks)

Row 16 (R to L): (Beige) x5, (Red) x10, (Beige) x1, (16 blocks)

Row 17 (L to R): (Beige) x1, (Red) x11, (Beige) x5, (17 blocks)

Row 18 (R to L): (Beige) x6, (Red) x11, (Beige) x1, (18 blocks)

Row 19 (L to R): (Beige) x1, (Red) x12, (Beige) x6, (19 blocks)

Row 20(R to L): (Beige) x7, (Red) x5, (Beige) x4, (Red) x3, (Beige) x1, (20 blocks)

Row 21 (L to R):(Beige) x1, (Red) x2, (Beige) x7, (Red) x4, (Beige) x7, (21 blocks)

Row 22(R to L): (Beige) x8, (Red) x3, (Beige) x8, (Red) x2, (Beige) x1, (22 blocks)

Row 23 (L to R):(Beige) x2, (Red) x1, (Beige) x9, (Red) x2, (Beige) x9, (23 blocks)

Row 24(R to L): (Beige) x2, (Red) x4, (Beige) x4, (Red) x2, (Beige) x8,  (Red) x2,(Beige) x2 (24 blocks)

Row 25 (L to R):(Beige) x1, (Red) x7, (Beige) x2, (Red) x2, (Beige) x9,  (red) x2, (Beige) x2 (25 blocks)

Row 26(R to L): (Beige) x2, (Red) x2, (Beige) x9, (Red) x2, (Beige) x2, (Red) x8,(Beige) x1 (26 blocks)

Row 27 (L to R):(Beige) x1, (Red) x9, (Beige) x2, (Red) x1, (Beige) x10, (red) x1, (Beige) x3 (27 blocks)

Row 28(R to L): (Beige) x, (Red) x1, (Beige) x10, (Red) x1, (Beige) x2, (Red) x10,(Beige) x1 (28 blocks)

Row 29 (L to R):(Beige) x2, (Red) x10, (Beige) x2, (Red) x1, (Beige) x9, (Red) x2, (Beige) x3 (29 blocks)

Row 30(R to L): (Beige) x4, (Red) x1, (Beige) x12, (Red) x11, (Beige) x2, (30 blocks)

Row 31(L to R):(Beige) x2, (Red) x6, (Beige) x3, (Red) x3, (Beige) x11, (Red) x2, (Beige) x4,(31 blocks)

Row 32(R to L): (Beige) x5, (Red) x2, (Beige) x4, (Red) x4, (Beige) x2, (Red) x2, (Beige) x5, (Red) x4, (Beige) x3,(32 blocks)

Row 33(L to R): (Beige) x3, (Red) x4, (Beige) x6, (Red) x2, (Beige) x2,(Red) x6, (Beige) x2, (Red) x3, (Beige) x5,(33 blocks)

Row 34(R to L): (Beige) x6, (Red) x11, (Beige) x1, (Red) x2, (Beige) x7, (Red) x4, (Beige) x3,(34 blocks)

Row 35(L to R): (Beige) x4, (Red) x3, (Beige) x8, (Red) x14, (Beige) x6, (35 blocks)

Row 36(R to L): (Beige) x7, (Red) x14, (Beige) x8, (Red) x3, (Beige) x4, (36 blocks)

Row 37(L to R):(Beige) x5, (Red) x3, (Beige) x8, (Red) x13, (Beige) x8, (37  blocks)

INCREASING ON ONE SIDE ONLY

Row 38(R to L):(Beige) x9, (Red) x7, (Beige) x3, (Red) x3, (Beige) x8,(Red) x3, (Beige) x5,  (38 blocks)

Row 39 (L to R): (Beige) x5, (Red) x2, (Beige) x9, (Red) x2, (Beige) x4, (Red)x6, (Beige)x1, (Red)x4, (Beige)x5, (38 blocks)

Row 40(R to L): (Beige) x5, (Red) x5, (Beige) x11, (Red) x2,(Beige) x8, (Red) x2, (Beige) x5, (38 blocks)

Row 41(L to R):(Beige) x4, (Red) x2, (Beige) x8, (Red) x2, (Beige) x10, (Red) x6 , (Beige) x6 (38blocks)

Row 42(R to L): (Beige) x6, (Red) x7, (Beige) x9, (Red) x3, (Beige) x7, (Red) x2, (Beige) x4, (38 blocks)

Row 43(L to R): (Beige) x4,  (Red) x1,  (Beige) x7,  (Red) x7,  (Beige) x5,  (Red) x7,       (Beige) x7, (38 blocks)

DECREASING

Row 44(R to L): (Beige) x6,  (Red) x8,  (Beige) x3,  (Red) x9,  (Beige) x6,  (Red) x2,(Beige) x3, (37Blocks)

Row 45(L to R): Beige) x3, (Red) x2, (Beige) x6, (Red) x9, (Beige) x3, (Red) x4,(Beige) x9, (36 Blocks)

Row 46(R to L):  Beige) 9, (Red) x4, (Beige) x2, (Red) x9, (Beige) x7, (Red) x1,(Beige) x3 (35 Blocks)

Row 47(L to R): Beige) x2, (Red) x2, (Beige) x6, (Red) x4, (Beige) x3, (Red) x2,(Beige) x2, (Red) x4, (Beige) x9, (34 Blocks)

Row 48(R to L): Beige) x9, (Red) x3, (Beige) x2, (Red) x2, (Beige) x4, (Red) x3,(Beige) x7, (Red) x1, (Beige) x2, (33 Blocks)

Row 49(L to R): Beige) x2, (Red) x1, (Beige) x7, (Red) x1, (Beige) x5, (Red) x3,(Beige) x1, (Red) x3, (Beige) x9, (32 Blocks)

Row 50(R to L): (Beige) x4, (Red) x4, (Beige) x1, (Red) x2, (Beige) x1, (Red) x3,(Beige) x6, (Red) x1, (Beige) x6, (Red) x1, (Beige)x2, (31 Blocks)

Row 51(L to R): Beige) x2, (Red) x1, (Beige) x12, (Red) x3, (Beige) x1, (Red) x2,(Beige) x2, (Red) x3, (Beige) x4, (30 Blocks)

Row 52(R to L): Beige) x3, (Red) x1, (Beige) x2, (Red) x1, (Beige) x2, (Red) x1,(Beige) x1, (Red) x4, (Beige) x12,  (Red) x1,(Beige) x1, (29 Blocks)

Row 53(L to R): Beige) x1, (Red) x1 , (Beige) x11, (Red) x4, (Beige) x1, (Red) x2,(Beige) x2, (Red) x1, (Beige) x1,  (Red) x1, (Beige) x3, (28 Blocks)

Row 54(R to L): Beige) x2, (Red) x1, (Beige) x2, (Red) x1, (Beige) x2, (Red) x1,(Beige) x1, (Red) x6, (Beige) x9, (Red) x1, (Beige) x1, (27 Blocks)

Row 55(L to R): Beige) x1, (Red) x1, (Beige) x7, (Red) x7, (Beige) x2, (Red) x1,(Beige) x2, (Red) x3, (Beige) x2,  (26 Blocks)

Row 56(R to L): Beige) x1, (Red) x4, (Beige) x2, (Red) x1, (Beige) x2, (Red) x7,(Beige) x7,  (25 Blocks)

Row 57(L to R): Beige) x7, (Red) x8, (Beige) x2, (Red) x1, (Beige) x6,  (24 Blocks)

Row 58(R to L):Beige) x5, (Red) x1, (Beige) x3, (Red) x7, (Beige) x7, (23 Blocks)

Row 59(L to R): Beige) x6, (Red) x7, (Beige) x9,  (22 Blocks)

Row 60(R to L): Beige) x4, (Red) x1, (Beige) x4, (Red) x6, (Beige) x6, (21 Blocks)

Row 61(L to R): Beige) x6, (Red) x5, (Beige) x9, (20 Blocks)

Row 62(R to L): Beige) x10, (Red) x4, (Beige) x5, (19 Blocks)

Row 63(L to R): Beige) x5, (Red) x2, (Beige) x11, (18 Blocks)

Row 64(R to L): Beige) x17,  (17 Blocks)

Row 65(L to R): Beige) x16, (16 Blocks)

Row 66(R to L): Beige) x15, (15 Blocks)

Row 67(L to R): Beige) x14, (14 Blocks)

Row 68(R to L):Beige) x13, (13 Blocks)

Row 69(L to R): Beige) x12, (12 Blocks)

Row 70(R to L): Beige) x11, (11 Blocks)

Row 71(L to R): Beige) x10, (10 Blocks)

Row 72(R to L): Beige) x9, (9 Blocks)

Row 73(L to R): Beige) x8, (8 Blocks)

Row 74(R to L): Beige) x7, (7 Blocks)

Row 75(L to R): Beige) x6, (6 Blocks)

Row 76(R to L): Beige) x5, (5 Blocks)

Row 77(L to R): Beige) x4, (4 Blocks)

Row 78(R to L): Beige) x3, (3 Blocks)

Row 79(L to R): Beige) x2, (2 Blocks)

Row 80(R to L): Beige) x1, (1 Block)


To make a wall Hanging….

  1. Frame this
  2. Give this C2C a backing with a thick cloth, and fix a thin cord on the backing to hang it
  3.  Create a crochet edging on the top and bottom, broad enough to wrap around a 1 mm curtain rod/steel/wood/ aluminium rod-pipe etc (cut to size). Then use any edging pattern on the top and the bottom….fold it ….join the top of the edging to the top edge of the C2C on both ends. stick in the rods…if you hace you can enhace the edge of the rods with curtain stoppers…or make your own crochet curtain stoppers. tie a medium thick decorative string on two ends of the top rod and VOILA…you have a lovely wall hanging.


And there you are …A Beautiful Omkaaram.…You can use it as a wall hanging in your Pooja Room. Or can roll it and keep it safely and use it just for festive occassions and Sathsangs. Imagine how you can enhance the devotional aura of your home when having a pooja, yagna, Sathsang etc by hanging these sacred symbols on the walls in the room you are holding such sacred functions…..


How to fix a frame to a purse(one that does not have holes)

How to fix a ‘frame with no holes’ to a purse


The first thing that I would advise anyone who is going to buy purse frames is …Buy only ones that have perforations on them..They are the easiest to work with.  Buy the ones without holes only if you have no other option. But with online shopping you will find that you are really spoilt for choice.

Here are some of the frames available online


The First one is without any holes/perforations on the frame. So to fix your purse to this frame…one has to push the material inbetween the two wedges of the frame and use a plier to calmp on it.

The rest of the frames have holes..so you just sew your purse on to the frame using the holes to attach your crocheted purse to the frame with a tapestry needle and crochet thread or any strong thread of your choice.

When you have a frame with no holes…

Once you finish the crochet part of your purse…finish your lining….and then proceed to fixing the frame onto the purse.

I made a coin purse with a frame which as you can see had no holes. It was very diffiuclt getting the material to stay within the two metal wedges. So my Husband suggested that I attach a metal wire(a thick one ) at the mouth of the purse.

The wire below is usually used for floral arrangements so it is flexible but holds shape.

I then measured the mouth of the purse (which was two hexagons) and cut a strip of wire…to size

             teh

Then…atttach your yarn to the purse…place this strip of wire at the mouth of the purse on one hexagon and begin to sc (single crochet) over it..covering it completely.

Do this on both sides of the mouth of the purse…

Now push the edges into the metal wedges of the frame….use a file or a thin knife or even your crochet hook to push the material…deep inbetween the wedges of the frame.

Use a plier and clamp down hard on the metal frame so that it fits snuggly over the wire in the mouth of the purse. Use a thick material over the frame and then clamp the plier over it….becos if you use the plier directly over the frame, it may get damaged. ( I have not shown this here…because I wanted to show you how the plier is used)

There you are a lovely coin purse…….

Hope you found this useful…..do comment below and let me know what you think of this post and tell me if you found this useful…..I would really appreciate your feedback…;-)

How to keep your yarn from tangling while doing C2C graphghans

How to keep your yarn from tangling while doing C2C graphghans

How does one keep yarn from tangling when one is doing a C2C graphghan in crochet?

The first few pictures are of a 2 colour graphghan in the making.

The first thing I do when I think graphghan is roll out some shuttles depending on the requirement of each colour. There is nothing fancy about this. Weavers do this all the time…..They wind, small shuttles/bobbins full of the colour they need and keep them ready before they begin weaving. In India they usually use a small wooden peg. Here, since I don’t have a wooden peg and I think it may be unwieldy…I have used thick paper folded into shuttles that yarn or thread can be wound on.

For this 2 colour graphghan the  major colour is blue and the colour where the figure is coming in is silver white. So for the time begin I have wound up three shuttles, 2 with blue and one with white.

I am aware this will not be enough so…as I go by and am taking a break I will be  making some more shuttles. you can do this before you begin work too….

The next thing we will need is large washing pegs. These are somewhat middle sized….and since I can’t get large ones…I make sure that my shuttles are never too large. I have heard that Walmarts carry these giant washing pegs…so for those who live in the US or where you have a Walmarts can buy them from there.

Here, I worked the first 40 rows in just one colour working directly from the huge spool of yarn…..but once I had to change colours I began to use the shuttles.

Here is how I use the washing pegs…..only the shuttle that is currently being used is not pegged onto the work itself….the rest are secured. So as I finish the blue….I will move onto the white if necessary….And then I will peg in the blue and let free the white…and so  on. you can work in as many colours you like in this manner…..This is very useful especially when you reach the end of the row and have to flip your work over to begin the next row in C2C.

This is how I worked a C2C graphghan with many colours without getting it tangled…..

First 4 colours….

7 colours with the white repeating …so 8 shuttles…..

Crocheters use different methods….I find this most convenient.

Some use Hangers…They wind each colour directly onto the wash peg and clip the shuttles onto a clothes hanger….then when they reach the end of the row…they simply flip over the hanger along with the graphghan.

Others use boxes with holes in them. They bring out the working end of the yarn through the holes so that there is no chance of tangling……

I found some all of these pics on the internet…..

You must experiment and find which way you find the most handy to work with.

Suvastika Pattern in C2C

Suvastika

Suvastika is an ancient religious symbol originating from India.  It is one of the most sacred and auspicious symbols in Hinduism and dates back at least 11,000 years.

The name Suvastika comes from the Sanskrit (Devanagari: स्वस्तिक). Suvastika in Sanskrit means any lucky or auspicious object, and in particular a mark made on persons and things to denote auspiciousness, or any piece of luck or well-being.

The Hindus represent it as the Universe in our own spiral galaxy in the fore finger of Lord Vishnu. This carries most significance in establishing the creation of the Universe and the arms as ‘Kaal or time, a calendar that is seen to be more advanced than the lunar calendar where the seasons drift from calendar year to calendar year.

The Suvastika symbol is seen in, the Indus Valley civilization, which is now proven to be more than 8000 years old.

It is also an auspicious symbol in the two religions which arose from Hinduism – Buddhism and Jainism. The Suvastika was used in Tibet and China, And was also introduced to Indonesia by Hindu kings. Since Hindu civilization was widespread…..It was also used in  Vietnam, Cambodia ,the Mayan and Aztecs civilizations etc in the ancient world. 

Materials:

Nature’s cotton fromm Soft Feather yarn

white : 300gms

Orange : 300 gms

Hook: 3:00mm

Size:

22 inches by 17 inches (22″/17″)

Abbreviations:

ch – chain

ss – slip stitich

hdc – half double crochet

(dc – double crochet – if you wish to make a bigger piece use dcs in your C2C instead of half dcs….

Or

You can use a much thinner thread or yarn with a smaller hook)

C2C

1.Chain 5,

hdc in the 3rd chain from hook,

then one hdc in each of the next two chains

This is one block or cluster.

Turn over.

chain 5,

Repeat 1

then, ss in the 2 chain space of the first block,

2 ch; 3  hdc in the same chain space,

you have your second block….Turn over

Repeat as above

Things to Remember while doing a C2C

  1. Always keep count…that is very important….at every step make sure the number of steps tally to the counter of blcoks given in the pattern. Once you finish a row…recount the total number of blocks in each colour in that row and tally the total blocks. Proceed only when the tally is exact.
  2. Refrain from being distracted by watching TV, Internet etc.(just my suggestion, I learnt this the hard way..:-))
  3. Keep the graph and the written instructions in front of you at all times.
  4. I carry yarn only for upto 3 blocks….anything more than while using dc or hdc I find shows the carryign thread esp if it  is of a birght or  contrasting colour shows through.  In tapestry it is easy to carry the colours forward beocs the scs are short stitiches and does no tallow the carrying thread show.
  5. By making shuttles of each colour…I simply add  a new colour as and when the colour needs to be used after three blocks.  Below please go thorugh the link which wI use to keep the yarn’thread from tangling.

    How To Keep The Yarn from Tangling

http://https://crochetnmore.wordpress.com

GRAPH:

As you can see in this graph, the picture has some pixels in the wrong places though I used Stitch-board to do this one. The dots haven’t come out right at all and the lower leg of the right had side of the Suvastika had a few pixels out of place. So use the graph only   to help you visualise the final project.

I graphed this one by hand….

Begin from the bottom right side corner……

Increasing Rows

Row 1 (L to R): (Grey) x1, (1 Block)

Row 2 (R to L): (Grey) x2, (2 Blocks)

Row 3 (L to R): (Grey) x3, (3 Blocks)

Row 4 (R to L): (Grey) x4, (4 Blocks)

Row 5 (L to R): (Grey x5), (5 Blocks)

Row 6 (R to L): (Grey) x6, (6 Blocks)

Row 7 (L to R): (Grey) x7, (7 Blocks)

Row 8 (R to L): (Grey) x8, (8 Blocks)

Row 9 (L to R): (Grey) x9, (9 Blocks)

Row 10 (R to L): (Grey) x3,  (Orange) x1, (Grey) x6, (10 Blocks)

Row 11 (L to R): (Grey) x7,  (Orange) x1, (Grey)  x3, (11 Blocks)

Row 12 (R to L): (Grey) x3, (Orange) x2,( Grey) x7), (12 Blocks)

Row 13 (L to R): (Grey) x8, (Orange) x1, (Grey) x4, (13 Blocks)

Row 14 (R to L): (Grey) x4, (Orange) x2, (Grey) x8, (14 Blocks)

Row 15(R to L): (Grey) x8, (Orange) x2, (Grey) x5, (15 Blocks)

Row 16 (R to L): (Grey) x5, (Orange) x2, (Grey) x9, (16 Blocks)

Row 17 (L to R): (Grey) x9, (Orange) x3, (Grey) x5, (17 Blocks)

Row 18 (R to L): (Grey) x6, (Orange) x3, (Grey) x9, (18 Blocks)

Row 19 (L to R): (Grey) x9, (Orange) x4, (Grey) x6, (19 Blocks)

Row 20 (R to L): (Grey) x7, (Orange) x4, (Grey) x9, (20 Blocks)

Row 21 (L to R): (Grey) x9, (Orange) x5, (Grey) x7, (21 Blocks)

Row 22 (R to L): (Grey) x8, (Orange) x5, (Grey) x9, (22 Blocks)

Row 23 (L to R): (Grey) x9, (Orange) x5, (Grey) x9, (23 Blocks)

Row 24 (R to L): (Grey) x9, (Orange) x6, (Grey) x9, (24 Blocks)

Row 25 (L to R): (Grey) x10, (Orange) x6, (Grey) x9, (25 Blocks)

Row 26 (R to L): (Grey) x11, (Orange) x6, (Grey) x9, (26 Blocks)

Row 27 (L to R): (Grey) x11, (Orange) x7, (Grey) x9, (27 Blocks)

Row 28 (R to L): (Grey) x12, (Orange) x7, (Grey) x9, (28 Blocks)

Row 29 (L to R): (Grey) x9, (Orange) x7, (Grey) x13, (29 Blocks)

Row 30 (R to L): (Grey) x14, (Orange) x7, (Grey) x9, (30 Blocks)

Row 31 (L to R): (Grey) x9, (Orange) x7, (Grey) x15, (31 Blocks)

Row 32 (R to L): (Grey) x13,(Orange) x1, (Grey) x2,(Orange) x7, (Grey) x9, (32 Blocks)

Row 33 (L to R): (Grey) x10, (Orange) x6, (Grey) x17, (33 Blocks)

Row 34 (R to L): (Grey) x14, (Orange) x1, (Grey) x3,(Orange) x6, (Grey) x10, (34 Blocks)

Row 35 (L to R): (Grey) x11, (Orange) x5, (Grey) x3, (Orange) x2, (Grey) x14, (35 Blocks)

Row 36(R to L): (Grey) x7, ( Orange) x3, (Grey) x3, (Orange) x4, (Grey) x3, (Orange) x5, (Grey) x11 – (36 Blocks)

Row 37(L to R): (Grey) x11, ( Orange) x6, (Grey) x3, (Orange) x3, (Grey) x3, (Orange) x5, (Grey) x6 – (37 Blocks)

Row 38(R to L): (Grey) x6, ( Orange) x6, (Grey) x3, (Orange) x2, (Grey) x3, (Orange) x6, (Grey) x12 – (38 Blocks)

Row 39(L to R): (Grey) x13, ( Orange) x6, (Grey) x3, (Orange) x1, (Grey) x3, (Orange) x7, (Grey) x6 – (39 Blocks)

Row 40(R to L): (Grey) x6, ( Orange) x8, (Grey) x6, (Orange) x6, (Grey) x14,  (40 Blocks)

Row  41(L to R): (Grey) x15, ( Orange) x6, (Grey) x5, (Orange) x9, (Grey) x6,   – (41 Blocks)

Row 42(R to L): (Grey) x6, ( Orange) x10, (Grey) x4, (Orange) x6, (Grey) x16,  (42 Blocks)

Row  43(L to R): (Grey) x17, ( Orange) x6, (Grey) x3, (Orange) x11, (Grey) x6,   – (43 Blocks)

Row 44(R to L): (Grey) x6, ( Orange) x12, (Grey) x2, (Orange) x6, (Grey) x18,  (44 Blocks)

Row  45(L to R): (Grey) x19, ( Orange) x6, (Grey) x1, (Orange) x13, (Grey) x6,   – (45 Blocks)

Row 46(R to L): (Grey) x6, ( Orange) x5, (Grey) x1, (Orange) x14, (Grey) x20,  (46 Blocks)

Row  47(L to R): (Grey) x21, ( Orange) x13, (Grey) x2, (Orange) x5, (Grey) x6,   – (47 Blocks)

Row 48(R to L): (Grey) x6, ( Orange) x5, (Grey) x3, (Orange) x12, (Grey) x3, (Orange) x1, (Grey) x18 – (48 Blocks)

DECREASE ON ONE SIDE ONLY

Row 49(L to R): (Grey) x4, ( Orange) x6, (Grey) x7, (Orange) x2, (Grey) x3, (Orange) x11, (Grey) x4, (Orange)x5, (Grey)x6 – (48 Blocks)

Row 50(R to L): (Grey) x6, ( Orange) x5, (Grey) x5, (Orange) x10, (Grey) x3, (Orange) x3, (Grey) x6, (Orange) x6, (Grey) x4 – (48 Blocks)

Row 51(L to R): (Grey) x4, ( Orange) x7, (Grey) x4, (Orange) x4, (Grey) x3, (Orange) x9, (Grey) x3, (Orange) x1, (Grey) x2, (Orange) x5, (Grey) x6 – (48 Blocks)

Row 52(R to L): (Grey) x6, ( Orange) x5, (Grey) x2, (Orange) x2, (Grey) x3, (Orange) x8, (Grey) x3, (Orange) x4, (Grey) x4,(Orange) x6, (Grey) x5- (48 Blocks)

Row 53(L to R): (Grey) x5, ( Orange) x6, (Grey) x4, (Orange) x3, (Grey) x3, (Orange) x8, (Grey) x3, (Orange) x3, (Grey) x2, (Orange) x5, (Grey) x6 – (48 Blocks)

Row 54(R to L): (Grey) x6, ( Orange) x5, (Grey) x2, (Orange) x4, (Grey) x3, (Orange) x8, (Grey) x3, (Orange) x2, (Grey) x4,(Orange) x5, (Grey) x6- (48 Blocks)

Row 55(L to R): (Grey) x6, ( Orange) x5, (Grey) x4, (Orange) x1, (Grey) x3, (Orange) x9, (Grey) x3, (Orange) x4, (Grey) x2, (Orange) x6, (Grey) x5 – (48 Blocks)

Row 56(R to L): (Grey) x4, ( Orange) x6, (Grey) x4, (Orange) x3, (Grey) x3, (Orange) x10, (Grey) x7, (Orange) x5, (Grey) x6,( (48 Blocks)

Row 57(L to R): (Grey) x6, ( Orange) x5, (Grey) x6, (Orange) x11, (Grey) x3, (Orange) x2, (Grey) x5, (Orange) x6, (Grey) x4, – (48 Blocks)

Row 58(R to L): (Grey) x5, ( Orange) x4, (Grey) x7, (Orange) x1, (Grey) x3, (Orange) x12, (Grey) x5, (Orange) x5, (Grey) x6,( (48 Blocks)

Row 59(L to R): (Grey) x6, ( Orange) x5, (Grey) x4, (Orange) x13, (Grey) x20,   – (48 Blocks)

Row 60(R to L): (Grey) x20, ( Orange) x14, (Grey) x3, (Orange) x5, (Grey) x6,   – (48 Blocks)

DECREASING ON BOTH SIDES:

Row 61(L to R): (Grey) x6, ( Orange) x5, (Grey) x2, (Orange) x8, (Grey)x1; (Orange)x6; (Grey) x19,   – (47 Blocks)

Row 62(R to L): (Grey) x18, ( Orange) x6, (Grey) x2, (Orange) x7, (Grey) x1, (Orange)x5; (Grey) x6, – (46 Blocks)

Row 63(L to R): (Grey) x6, ( Orange) x13, (Grey) x3, (Orange) x6, (Grey) x17,   – (45 Blocks)

Row 64(R to L): (Grey) x16, ( Orange) x6, (Grey) x4, (Orange) x12, (Grey) x6,   – (44 Blocks)

Row 65(L to R): (Grey) x6, ( Orange) x11, (Grey) x5, (Orange) x6, (Grey) x15,   – (43 Blocks)

Row 66(R to L): (Grey) x14, ( Orange) x6, (Grey) x6, (Orange) x10, (Grey) x6,   – (42 Blocks)

Row 67(L to R): Grey) x6, ( Orange) x9, (Grey) x3, (Orange) x1, (Grey) x3, (Orange)x5; (Grey) x14, – (41 Blocks)

Row 68(R to L): (Grey) x13, ( Orange) x5, (Grey) x3, (Orange) x2, (Grey) x3, (Orange)x8; (Grey) x6, – (40 Blocks)

Row 69(L to R): (Grey) x6, ( Orange) x7, (Grey) x3, (Orange) x3, (Grey)x3; (Orange)x5; (Grey) x12,   – (39 Blocks)

Row 70(R to L): (Grey) x12, ( Orange) x4, (Grey) x3, (Orange) x4, (Grey) x4, (Orange)x5; (Grey) x6, – (38 Blocks)

Row 71(L to R): (Grey) x6, ( Orange) x5, (Grey) x4, (Orange) x4, (Grey)x3; (Orange)x 4; (Grey) x11,   – (37 Blocks)

Row 72(R to L): (Grey) x10, ( Orange) x4, (Grey) x3, (Orange) x3, (Grey) x6, (Orange)x2; (Grey) x6, – (36 Blocks)

Row 73(L to R): (Grey) x15, ( Orange) x2, (Grey) x3, (Orange) x5, (Grey)x10; – (35 Blocks)

Row 74(R to L): (Grey) x10, ( Orange) x5, (Grey) x3, (Orange) x1, (Grey) x15,  – (34 Blocks)

Row 75(L to R): (Grey) x18, ( Orange) x5, (Grey) x10  –  (33 Blocks)

Row 76(R to L): (Grey) x10, ( Orange) x5, (Grey) x17,   –  (32 Blocks)

Row 77(L to R): (Grey) x16, ( Orange) x6, (Grey) x9  –  (31 Blocks)

Row 78(R to L): (Grey) x9, ( Orange) x6, (Grey) x15,   –  (30 Blocks)

Row 79(L to R): (Grey) x14, ( Orange) x6, (Grey) x9  –  (29 Blocks)

Row 80(R to L): (Grey) x9, ( Orange) x6, (Grey) x13,   –  (28 Blocks)

Row 81(L to R): (Grey) x12, ( Orange) x6, (Grey) x9  –  (27 Blocks)

Row 82(R to L): (Grey) x9, ( Orange) x6, (Grey) x11,   –  (26 Blocks)

Row 83(L to R): (Grey) x10, ( Orange) x6, (Grey) x9  –  (25 Blocks)

Row 84(R to L): (Grey) x9, ( Orange) x5, (Grey) x10,   –  (24 Blocks)

Row 85(L to R): (Grey) x9, ( Orange) x5, (Grey) x9  –  (23 Blocks)

Row 86(R to L): (Grey) x9, ( Orange) x5, (Grey) x8,   –  (22 Blocks)

Row 87(L to R): (Grey) x8, ( Orange) x4, (Grey) x9  –  (21 Blocks)

Row 88(R to L): (Grey) x9, ( Orange) x4, (Grey) x7,   –  (20 Blocks)

Row 89(L to R): (Grey) x7, ( Orange) x3, (Grey) x9  –  (19 Blocks)

Row 90(R to L): (Grey) x9, ( Orange) x3, (Grey) x6,   –  (18 Blocks)

Row 91(L to R): (Grey) x6, ( Orange) x3, (Grey) x8  –  (17 Blocks)

Row 92(R to L): (Grey) x8, ( Orange) x3, (Grey) x5,   –  (16 Blocks)

Row 93(L to R): (Grey) x5, ( Orange) x2, (Grey) x8  –  (15 Blocks)

Row 94(R to L): (Grey) x8, ( Orange) x1, (Grey) x5,   –  (14 Blocks)

Row 95(L to R): (Grey) x4, ( Orange) x2, (Grey) x7  –  (13 Blocks)

Row 96(R to L): (Grey) x7, ( Orange) x1, (Grey) x4,   –  (12 Blocks)

Row 97(L to R): (Grey) x6, ( Orange) x1, (Grey) x4  –  (11 Blocks)

Row 98(R to L): (Grey) x3, ( Orange) x1, (Grey) x4,   –  (10 Blocks)

Row 99(L to R): (Grey) x9  –  (9 Blocks)

Row 100(R to L): (Grey) x8  –  (8 Blocks)

Row 101(L to R):(Grey) x7  –  (7 Blocks)

Row 102(R to L): (Grey) x6   –  (6 Blocks)

Row 103(L to R):(Grey) x5  –  (5 Blocks)

Row 104(R to L): (Grey) x4  –  (4 Blocks)

Row 105(L to R):(Grey) x3  –  (3 Blocks)

Row 106(R to L): (Grey) x2  –  (2 Blocks)

Row 107(L to R):(Grey) x1  –  (1 Blocks)

That is it….All Done!

To make a wall Hanging….
  1. Frame this
  2. Give this C2C a backing with a thick cloth, and fix a thin cord on the backing to hang it
  3.  Create a crochet edging on the top and bottom, broad enough to wrap around a 1 mm curtain rod/steel/wood/ aluminium rod-pipe etc (cut to size). Then use any edging pattern on the top and the bottom….fold it ….join the top of the edging to the top edge of the C2C on both ends. stick in the rods…if you hace you can enhace the edge of the rods with curtain stoppers…or make your own crochet curtain stoppers. tie a medium thick decorative string on two ends of the top rod and VOILA…you have a lovely wall hanging.

And there you are …A Beautiful Suvastika.…You can use it as a wall hanging in your Pooja Room. Or can roll it and keep it safely and use it just for festive occassions and Sathsangs. Imagine how you can enhance the devotional aura of your home when having a pooja, yagna, Sathsang etc by hanging these sacred symbols on the walls in the room you are holding such sacred functions…..

Hans/Hamsam/Swan Motif

Hans/Hamsam/Swan Motif

So this week’s  wonderful challenge by Tulasi K Reddy  is a swan motif and what bird could be dearer to us after the peacock? It is a great pattern made out of a pinepple motif and I salute the brain that conjured this one up.

Swans have been eulogised in Indian Literature and Hinduism, for many thousands of years….Beautiful, graceful and almost celestial….they have inspired poets and artists all over the world.

In India, the Hamsa, or Hansa,  Arayanna, or heavenly hamsa (swans), are said to live in Manasasaras in the  Himalayas. They are mentioned in , the Ramayana. Hamsa, the swan, is part of the love story of Nala and Damayanthi in the Mahabharatha…where it carries the stories, historical information and messages between the two lovers.

In the West….the most famous contemporary story about the Swan is the fairy tale “The Ugly Duckling”. And what an adorable little tale it is……

The hamsa, or the swan, is often identified with the Supreme Spirit, Ultimate Reality or  Brahman in  Hinduism. The flight of the hamsa symbolizes moksha, the release from the cycle of samsara or life cycles on this earth.

The hamsa is also the vahana of  Saraswathi– the Goddess of knowledge and creative arts, and her husband, God Brahma.

And now on to making some crochet music with the Hamsa

Materials

Anchor #20 – white

Hook

#1:00mm

Abbreviations

ss – slip stitch

ch – chain

sc – single crochet

hdc – half double crochet

dc – double crochet

treble crochet – tc

ss – slip stitich

Pattern

Method

Make a slip stitich


Row 1:

3 ch up, 1 dc; 2chs; 2dcs; 2chs; 2dc into the magic ring

Pull in the short tail of the magic ring tightening the stitches into a continous row.

Row 2:

3 ch up, 1 dc in next dc; (2dcs 2ch 2dc) in 2ch loop, 3 ch; skip 2 dcs; 2 dcs in 2 ch loop; 2 chs; 3dc in same 2 ch loop do not complete the last dc …holding the last 2 loops on the hook…crochet in a dc in the last dc then pull then yarn over and pull it thru all the 3 loops on the hook. Thus creating an inverted ‘V’ Stitch which we sha call (‘IV’) form now on.

Row 3:

3ch up; skip 2 dc; 2 dc, 2ch, 2dc into the first 2 ch loop; 2 ch, dc, 3ch, dc into the 3 ch loop;  2ch; 2 dc, 2ch, 2dc into the first 2 ch loop; dc into dc; skip one dc; dc into next dc,keep two loops on the hook, dc in next dc and pull the yarn thru all the 3 loops on the hook.(IV)

Row 4:

3 ch up, dc  each in next 2 dcs; ch; 2 dc, 2ch, 2dc into the first 2 ch loop; 2 ch; Hook  (dc, ch,dc) 3 times  into the 3 chain loop( this is the base of your pineapple stitch); 2 ch; 2 dc, 2ch, 2dc into the next 2 ch loop; dc into last dc

Row 5:

5 ch up;  2 dc, 2ch, 2dc into the first 2 ch loop; 2ch; sc in first dc in 3 ch loop, 3 ch, sc into next dc, 3 ch, repeat until you cover all the dcs and get 4 (3ch) loops( This is the 2nd tier of your pineapple stitch.); 2ch; 2 dc, 2ch, 2dc into the next 2 ch loop.

You leave the rest of the stitches on the previous stitches vacant for now…This is where you will work the neck.

Row 6

5 ch up;  2 dc, 2ch, 2dc into the first 2 ch loop; 2ch; sc in first dc in 3 ch loop, 3 ch, sc into next dc, 3 ch, repeat until you cover all the dcs and get 3 (3ch) loops( This is the 3rd tier of your pineapple stitch.); 2ch; 2 dc, 2ch, 2dc into the next 2 ch loop.

Row 7:

5 ch up;  2 dc, 2ch, 2dc into the first 2 ch loop; 2ch; sc in first dc in 3 ch loop, 3 ch, sc into next dc, 3 ch, repeat until you cover all the dcs and get 2 (3ch) loops( This is the 4th tier of your pineapple stitch.); 2ch; 2 dc, 2ch, 2dc into the next 2 ch loop

Row 8:

5 ch up;  2 dc, 2ch, 2dc into the first 2 ch loop; 2ch; sc in first dc in 3 ch loop, 3 ch, sc into next dc, and get one (3ch) loop( This is the 5th tier of your pineapple stitch.); 2ch; 2 dc, 2ch, 2dc into the next 2 ch loop

Row 9:

5 ch up;  2 dc, 2ch, 2dc into the first 2 ch loop; 4ch; sc in 3 ch loop, 3 ch, ss into sc, 3ch, ss into sc; 4ch; 2 dc, 2ch, 2dc into the next 2 ch loop.

Row 10:

5 ch up;  2 dc, 2ch, 2dc into the first 2 ch loop; 5ch;  2 dc, 2ch, 2dc into the first 2 ch loop

Row 11:

3 ch up; double treble(keeping the last 2 loops on the hook) another double treble and keep all 3 loops on the hook and yarn over and pull through all 3 loops. A petal is formed

3 ch, 1 picot, 3ch; hook in a second petal as above.

Repeat until there are 3 picot loops and 4 petals.( this is the tail of the swan)

Cut the thread and tuck the loose ends in… You are done with the body of the swan.

Now for the Neck and Head…

Row 1:

Join the thread to fifth stitch(double crochet) from your left, of the fourth(4th) row.

3 ch up; dc in one ch loop; dc in next dc, leave the last two loops on the hook, dc in next dc…now pull thru all 3 loops. (IV)

Row 2:

2 ch up;  dc in next dc ;2 dcs in next dc

Row 3:

3ch up, dc in same dc; dc in next dc; (IV)

Row 4:

2 ch up; dc in next dc; 2 dcs in next dc

Row 5:

5 ch up; double treble in same stitch; hdc in next dc; sc in next stitch

Row 6:

one chain up; sc in next stitch; dc in next stitch, double treble in same stitch

Row 7:

5 ch up, double treble in same stitch; dc in next stitch; hdc  in next stitch

Row 8:

2 ch up; hdc in next dc; dc in next stitch; 2 dc in the last stitch

Row 9:

3 ch up; dc in next dc; dc in next dc, (IV)

Beak

( I made a little change to the pattern here….I wanted the beak to be a little authentic…so I used a #40 Anchor cotton in black and did 3 scs in a row after row 9

Then cut the thread tucked it in and added a #8 Pearl red DMC(also available in Anchor)

( If you don’t have #40 just use one thread of a 6 skein Hank of embroidery floss for the black portion and 2 threads of embroidery thread in red for the beak)

Now Using the red

If you don’t wish to change the thread continue with the same thread and finish off.

Row 10:

2 ch up; dc in same stitch

There you go…..a perfect Swan.

Star Burst Bauble/Hot Pad/Pendant

Star Burst

This is an extremely easy, fun project. We had this as part of a Weekly  challenge by my young,dynamic and talented pal, Tulasi K Reddy,  in our group and I just leapt at the chance…..mainly becos this was part of my to do list for the longest of time. It looks complicated to a novice but is really so easy and is an apt project for a beginner.

Material

You can use any thread you wish just adjust the hook size accordingly.

I used:

Soft Feather Nature’s cotton in Turquoise green and cobalt blue

Hook Size: 3:00mm. This is my favourtie size for Nature’s cotton yarn.

Abbreviations Used:

sc – single crochet

dc – double crochet

ss – slip stitch

Pattern

Make a Magic Circle

Round 1: Chain 3 up, 3dc, 4 chain; 4dc, 4 chain; 4dc, 4 chain; 4dc, 4 chain; ss.


Round 2: ss into the next dc; chain up and sc in same dc.

Now into the 3 chain loop –  sc,hdc,8 dc,hdc

sc in the second dc of previous round then repeat sc, hdc,8dc,hdc  in next loop….

Repeat until all 4 loops are covered.

Make 5 such squares


Joining the squares and forming another row around the squares:

Join the cobalt blue by an ss to the sc in between the 2 petals. then scs in every hdc and dc.

Continue until  you cover 2 petals or are mid way.


Now join the 2nd motif to the first using a sc.


Continue joining all the motifs one by one unitl you have a straight line.

Then continue the sc row on the lower part of every motif.

The pics I took of the joining part didn’t come out right….balancing the camera with one hand and trying to hold the petals open with another just didn’t work…..so am using this pic that I found in the net…..to show you how to join the motifs.

You need to take one half one petal of 2 motifs that lie adjecent to each other and join them with an sc…then move on to the next two petals. You will then get 5 petals.


Depending on the size you wish you can use yarn or thread.

Cotton Yarn gives a a size that cna be used as a coaster….Alternatively you can make this is 3  colours too….Using birght colours to use in a child’s room or jsut above the crib for your baby.

A talented crochet buddy, Dipti Mallapur, made this as a pendant in #40 thread and it looked glorious!

This is a great little piece to hook in when you just want to have fun and take it easy….I hope you do…

Have Fun!